
Last summer, a homeowner in Somerville spent weeks picking out a beautiful new cabinet, only to find that their century-old plumbing sat exactly where the new drawers needed to slide. It’s a classic example of why a standard, off-the-shelf approach often fails in our unique Greater Boston homes. If you’re tired of staring at wasted gaps in a small layout or worrying about how high humidity might warp a cheap cabinet, a custom vanity installation bathroom project is the most reliable way to reclaim your space and your style.
You deserve a bathroom that works as hard as you do, combining professional-grade durability with a design that actually fits your footprint. We understand that the technical side, like matching plumbing to new styles or choosing moisture-resistant hardwoods, can feel like a high-stakes puzzle. This guide simplifies the process by teaching you how to plan, prepare, and execute an installation that looks like it was original to the house. We’ll walk through the specific project timeline and the essential steps to ensure your upgrade adds real value and lasting beauty to your home.
Key Takeaways
- Learn how custom design solves storage puzzles in small footprints, moving beyond the limitations of standard stock cabinets.
- Get the “Golden Rule” of measurements to handle common hurdles like uneven floors and plaster walls in historic Greater Boston homes.
- Compare the durability of quartz, marble, and granite to find the best moisture-resistant materials for your high-humidity environment.
- Walk through the technical steps of a custom vanity installation bathroom project, from subfloor inspection to scribing for a flush fit.
- Pick the right scale for mirrors and side-lighting to ensure your finished bathroom is as functional as it is beautiful.
Why a Custom Bathroom Vanity is the Secret to a Better Morning
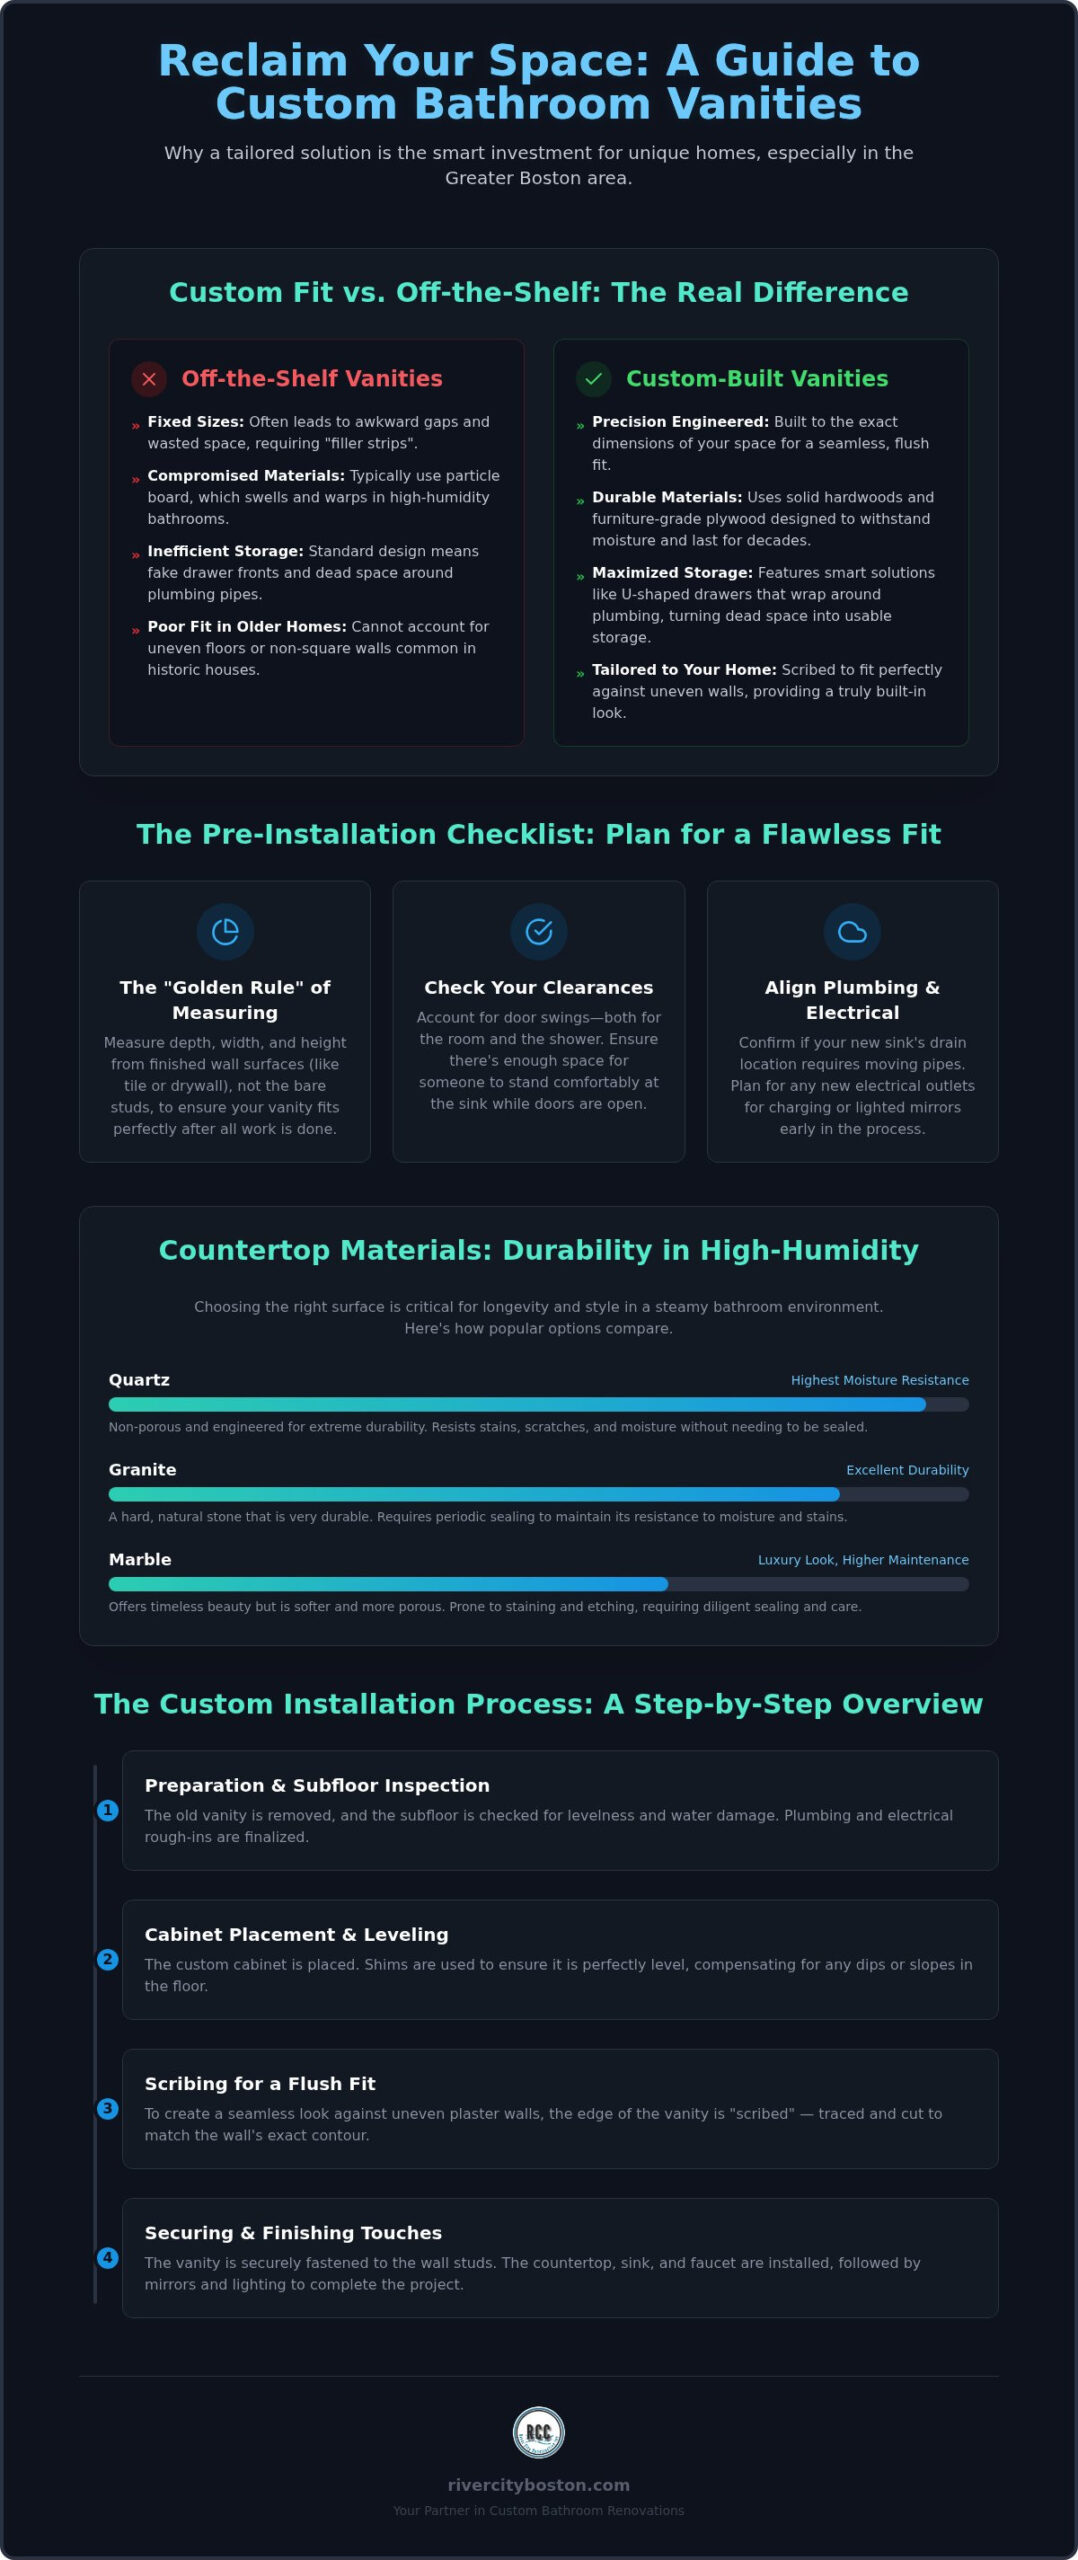
Imagine starting your day without fighting for counter space or digging through a cluttered cabinet for your toothbrush. In many Greater Boston homes, the bathroom is the smallest room, yet it carries the heaviest daily load. To understand why a tailored approach works best, we first have to ask: what is a bathroom vanity exactly? At its core, it is the marriage of storage and a sink, but when it is custom, it becomes a precision-engineered tool for your morning routine. Most homeowners choose between stock, semi-custom, and fully custom options. Stock cabinets come in fixed sizes, often leaving awkward gaps in older homes. Semi-custom offers more finishes, but you are still limited to standard depths. A full custom vanity installation bathroom project ensures every fraction of an inch is utilized, turning a cramped corner into a functional workspace.
The return on investment for custom work often surprises people. While big-box options are tempting for their price, they frequently rely on particle board. In a steamy bathroom in Medford or Somerville, that material acts like a sponge. It swells, peels, and degrades within a few years. Custom units utilize furniture-grade plywood or solid hardwoods that are built to survive high humidity. This longevity is a cornerstone of a luxury bathroom remodel Boston homeowners rely on to maintain home value over decades rather than just seasons.
Custom vs. Off-the-Shelf: Making the Right Investment
Historic Massachusetts rooms rarely have perfectly square corners or level floors. A custom vanity is a tailored furniture piece designed to accommodate specific plumbing and architectural dimensions. This means we build the cabinet to fit your home, rather than forcing your home to fit a box. Choosing solid wood over mass-produced alternatives prevents the structural sagging common in cheaper models. You get a piece that feels sturdy, operates smoothly, and matches the unique character of your residence.
Maximizing Storage in Historic Massachusetts Homes
In local renovations, we often face the “storage puzzle.” Standard drawers usually hit the plumbing under the sink, leaving you with a fake drawer front that does nothing. Custom builders create U-shaped drawer boxes that wrap around the pipes. This simple change turns dead space into a perfect home for small items. We also focus on avoiding “filler strips.” These are the flat pieces of wood used to bridge gaps between a stock cabinet and a wall. They look unfinished and waste valuable inches. A custom build fits flush against your walls, providing a seamless, built-in look that maximizes every available square inch of your floor plan.
Pre-Installation Checklist: Getting Your Bathroom Ready
Before the sawdust flies, you need a solid plan. A successful custom vanity installation bathroom project depends entirely on the accuracy of your preparation. In older neighborhoods like Medford or Somerville, floors are rarely level and walls are rarely plumb. If you skip the checklist, you might find your beautiful new custom piece won’t actually fit the space it was designed for. Preparation isn’t just about clearing the room; it’s about anticipating the quirks of your home’s architecture.
The “Golden Rule” of bathroom measurements involves three critical dimensions: depth, width, and height. You must measure from the finished wall surface, such as tile or drywall, rather than the studs. If you measure from the studs, your vanity will be too wide once the wall is finished. We also recommend finalizing your flooring before the vanity arrives. Installing the floor first ensures the cabinet sits at the correct height and prevents the “buried” look that happens when tile is laid around a base. This approach also makes future floor changes much easier since the vanity sits on top of the surface.
Measuring Like a Pro for a Flawless Fit
Traffic flow is the most overlooked part of bathroom design. You need to account for door swings, including the main bathroom door and any glass shower doors. Ensure there is enough clearance for someone to stand at the sink while the door is open. In tight spaces, identify “dead zones” where the internal structure of the vanity might clash with your existing plumbing. If your pipes come out of the wall at an odd angle, your custom drawers might not close properly without modification.
Managing Plumbing and Electrical Requirements
Check your plumbing alignment early. If your new sink is centered differently than the old one, you’ll need to relocate the pipes. This is also the time to plan for modern conveniences like internal outlets. These allow you to keep hair dryers or electric shavers plugged in inside the cabinet, keeping your counters clear. For complex pipe relocation or wiring, looking into our bathroom-service can help you integrate these systems safely. If you’re feeling overwhelmed by the technical details of a historic home, you can always reach out to our team for guidance. We believe that a little extra diligence during the planning stage saves hours of frustration during the actual build.
Selecting Materials for Durability and Style
Choosing the right materials is where your vision truly takes shape. In our region, the climate plays a significant role in how your bathroom ages. High humidity during the summer and dry heat in the winter can wreak havoc on inferior products. A successful custom vanity installation bathroom project relies on selecting components that don’t just look beautiful on day one but remain functional for decades. We focus on materials that balance the historic charm of our local architecture with the performance requirements of a modern household.
The sink style you choose often dictates the daily maintenance level of your vanity. Undermount sinks are the industry standard for a reason. They allow you to wipe water and debris directly from the counter into the basin without hitting a lip. If you want a bolder statement, vessel sinks sit on top of the counter like a piece of art. For a truly seamless look, integrated sinks are carved from the same material as the countertop, eliminating seams where mold might grow. Your hardware finishes should tie these elements together. We often recommend unlacquered brass or matte black to complement the specific aesthetic of a bathroom remodel Cambridge MA project, where traditional roots meet contemporary luxury.
Countertop Choices: Balancing Beauty and Maintenance
Quartz is currently the most popular choice for bathroom surfaces. It is non-porous, meaning it won’t soak up spilled makeup or toothpaste. Unlike natural stone, it never needs to be sealed. Natural marble and granite offer a unique, organic beauty that many homeowners prefer, but they require more diligence. Marble is prone to “etching” from acidic cleaners, so it’s best for primary suites rather than high-traffic kids’ bathrooms. When weighing these options, consider how small bathroom renovation costs can fluctuate based on the rarity and thickness of the slab you select.
Cabinet Materials That Stand Up to New England Humidity
The internal structure of your vanity is just as important as the surface. We always advocate for furniture-grade plywood boxes over MDF or particle board. Plywood holds screws better and won’t swell if a pipe develops a minor leak. For the exterior, choose finishes like conversion varnishes that create a hard, moisture-proof barrier. These won’t peel or yellow over time like standard latex paint. We are also seeing a rise in “smart” materials with antimicrobial properties baked into the finish, which helps keep your surfaces cleaner between deep scrubs.
Step-by-Step: The Custom Vanity Installation Process
Executing a professional custom vanity installation bathroom project requires a disciplined sequence of events. Unlike a standard cabinet install, custom work demands a higher level of precision to ensure the piece integrates seamlessly with your home’s existing structure. We follow a methodical five-step process to guarantee a result that looks like it was built into the room from day one.
- Step 1: Removing the old unit and inspecting the subfloor. Once the old cabinet is out, we check for water damage or structural rot. It’s common in older homes to find that a previous leak has softened the subfloor, which must be reinforced before the new weight is added.
- Step 2: Scribing for a flush fit. This is the hallmark of a master craftsman. We trace the unique irregularities of your plaster walls onto the cabinet so it sits perfectly tight against the surface without gaps.
- Step 3: Leveling and securing. We find the highest point on the floor and use that as our benchmark. The cabinet is then leveled and fastened directly into the wall studs using heavy-duty cabinetry screws.
- Step 4: Installing the countertop and sealing the backsplash. The stone is set with high-grade adhesive. We then apply a bead of silicone along the backsplash to prevent water from slipping behind the unit.
- Step 5: Final plumbing hookups and hardware alignment. We reconnect the drains and supply lines. The final step is adjusting the drawer glides and hinges so every door sits perfectly square.
Securing the Cabinet and Leveling
Most historic floors in the Greater Boston area suffer from what we call the “Boston Lean.” To compensate for this, we use cedar shims to lift the cabinet until it’s perfectly level. This prevents your countertop from having a slope, which would cause water to pool in the corners. We always locate at least two wall studs to anchor the unit securely. To scribe a cabinet side for a perfect wall fit, use a compass to trace the wall’s unique bumps onto a sacrificial strip of wood and trim it precisely to match the uneven surface. This ensures a seamless built-in look that no stock cabinet can replicate.
Sink and Faucet Integration
Connecting the plumbing is where many DIY projects fail. We use high-quality silicone to seal the sink to the countertop, creating a waterproof bond that won’t crack over time. When connecting P-traps and supply lines, it’s vital to hand-tighten the plastic nuts first to avoid stripping the threads. Once everything is connected, we run the water for at least ten minutes. This tests both the pressure and the drainage, ensuring there are no hidden slow drips before we finish the project. We don’t consider the job done until every connection is bone-dry and the water pressure is optimized for your new fixtures.
Finishing Touches: Lighting, Mirrors, and Professional Results
The final stage of your project is where the functional cabinet transforms into a design centerpiece. Choosing the right mirror is the first step in this visual balance. A common rule is to select a mirror that is two to four inches narrower than your vanity width. This creates a centered, intentional look that doesn’t overwhelm the wall or make the room feel top-heavy. Lighting is equally critical to the final result. We always recommend side-mounted sconces over a single overhead bar. Side-lighting provides even illumination across your face, which is much better for daily routines than the harsh, downward shadows created by overhead fixtures.
A high-quality custom vanity installation bathroom project is a smart financial move for any homeowner. Beyond the daily convenience of better storage, these upgrades contribute significantly to the ROI of your home. In the Greater Boston market, buyers look for durability and craftsmanship that respects the house’s original character. A custom piece signals that the home has been maintained with a high standard of care and attention to detail. This level of quality is a hallmark of the River City Construction Inc promise to deliver precision in every corner.
Why Professional Installation Saves You Money
River City Construction Inc’s Approach to Bathroom Design
Our work in Newton and Lexington has taught us that every historic home has its own personality. We’ve spent years learning how to handle the quirks of New England architecture, from shifting foundations to original plaster walls. We don’t just install a cabinet; we ensure it integrates with the soul of your home. If you’re ready to move away from wasted space and toward a bathroom that truly fits your needs, we’re here to help. Schedule your free bathroom vanity consultation with River City Construction Inc and let’s start planning a space that combines traditional integrity with modern luxury.
Start Your Bathroom Transformation Today
A successful custom vanity installation bathroom project is about more than just picking a cabinet. It’s about precision measurements that account for the quirks of historic New England architecture and selecting materials that stand up to our local humidity. You’ve learned how to plan for plumbing, choose durable surfaces like quartz, and understand the technical steps that ensure a flush, professional fit. These details are what turn a simple renovation into a lasting investment in your home’s value.
As licensed and insured general contractors, River City Construction Inc has been serving the Greater Boston area with a focus on high-end residential renovations. We specialize in the unique challenges of historic home renovations in Winchester and Somerville, ensuring every project respects the integrity of the original structure while providing modern functionality. You don’t have to manage the stress of complex plumbing and electrical integration by yourself.
Your ideal bathroom is within reach. We look forward to helping you create a functional, beautiful space that fits your home perfectly.
Frequently Asked Questions
How long does a custom vanity installation usually take?
A typical installation takes between one and three days once the custom unit arrives at your home. This timeline includes removing the old fixture, securing the new cabinet, and allowing adhesives for the countertop to cure. If your project involves moving plumbing or electrical outlets, the process might lean toward the longer end of that range.
Do I need a permit to replace a bathroom vanity in Boston?
Permits are generally required in cities like Boston, Cambridge, or Somerville if your project involves altering plumbing or electrical lines. Simply swapping an identical unit might not trigger a permit, but most custom upgrades involve some relocation of pipes to maximize storage. It’s best to check with your local building department to ensure your project stays up to code.
Can I install a floating vanity on any type of wall?
You can install a floating vanity on most walls, but it requires structural reinforcement known as blocking inside the wall. Because these units don’t have legs, the wall studs must bear the entire weight of the cabinet and heavy stone countertop. We install solid wood supports between the studs before the drywall is finished to ensure the unit never sags or pulls away.
What is the best height for a custom bathroom vanity?
The best height for a modern custom vanity is 36 inches, which is known as comfort height. Older standard vanities were often 30 to 32 inches tall, which can feel low for many adults. A custom build allows you to tailor this height exactly to your needs, which is a key benefit of a custom vanity installation bathroom project.
Should I buy my own vanity or have my contractor build it?
Having a contractor build or source a custom unit is usually the better choice for long term durability. Big-box vanities often use particle board that swells in high humidity. A custom build uses furniture-grade plywood and solid hardwoods that are specifically finished to resist the moisture common in New England bathrooms.
How much does custom vanity installation cost compared to stock?
What happens if my new vanity doesn’t line up with my old plumbing?
If the plumbing doesn’t align, we relocate the pipes inside the wall to match the new cabinet’s layout. This is a common part of a custom vanity installation bathroom, especially when moving from a standard cabinet to one with modern drawer configurations. Relocating the lines ensures you don’t have to cut into your new custom drawers to make room for old pipes.
Can I reuse my existing faucet with a new custom vanity?
You can certainly reuse your existing faucet if it is in good condition and matches the hole pattern of your new countertop. When we order your custom top, we need to know if your faucet is a single-hole, four-inch centerset, or eight-inch widespread model. This ensures the stone is cut precisely for the hardware you already love.
