What if the best deck lighting installation starts with where you walk and gather, not how many fixtures you can fit? A well-planned layout can make steps and pathways easier to see while giving the space a comfortable glow for evenings outside. Choosing between solar, low-voltage, and plug-in options can feel confusing, especially if you’re concerned about visible wires or disturbing finished decking.
The right setup depends on how you use your deck, where light is needed, and how the deck is built. A few carefully placed fixtures may serve you better than a bright light in every corner.
This guide compares common lighting options and explains how to plan a cohesive layout for walking routes and gatherings. You’ll also learn what to consider before adding wiring and why it can help to coordinate lighting decisions with deck construction. For homeowners in Boston, Winchester, Medford, Somerville, Cambridge, Belmont, Lexington, Concord, Wellesley, Newton, Wayland, and Natick, the goal is a lighting plan that fits the deck and the way your household uses it.
Key Takeaways
- Identify where people walk, gather, and use the deck after dark, then prioritize lighting for those areas.
- Compare solar, low-voltage, and plug-in options by their wiring needs, placement flexibility, and fit with your deck.
- Plan fixture locations and wire routes before work begins to limit visible wiring and disruption to finished surfaces.
- Account for the deck material and structure when deciding where fixtures can fit and how wiring can be routed.
- If adding lights involves changing the deck itself, coordinate the lighting plan with deck construction for a more cohesive result.
Deck lighting installation in Greater Boston: make the space safer and more inviting
After dinner, you step onto the deck to bring in a few plates. A guest follows, pausing to find the edge of the top step. It’s a familiar moment and a useful reminder: lighting should reflect how people move through and enjoy the space. A thoughtful deck lighting installation can make steps and walkways easier to see while creating a softer atmosphere for conversation.
Deck lighting installation is the planning and placement of lights to support movement, gathering, and everyday outdoor use. The aim isn’t to illuminate every board. Put light where it serves a purpose, then create a comfortable setting without relying on one harsh, bright source.
Which deck areas need light first?
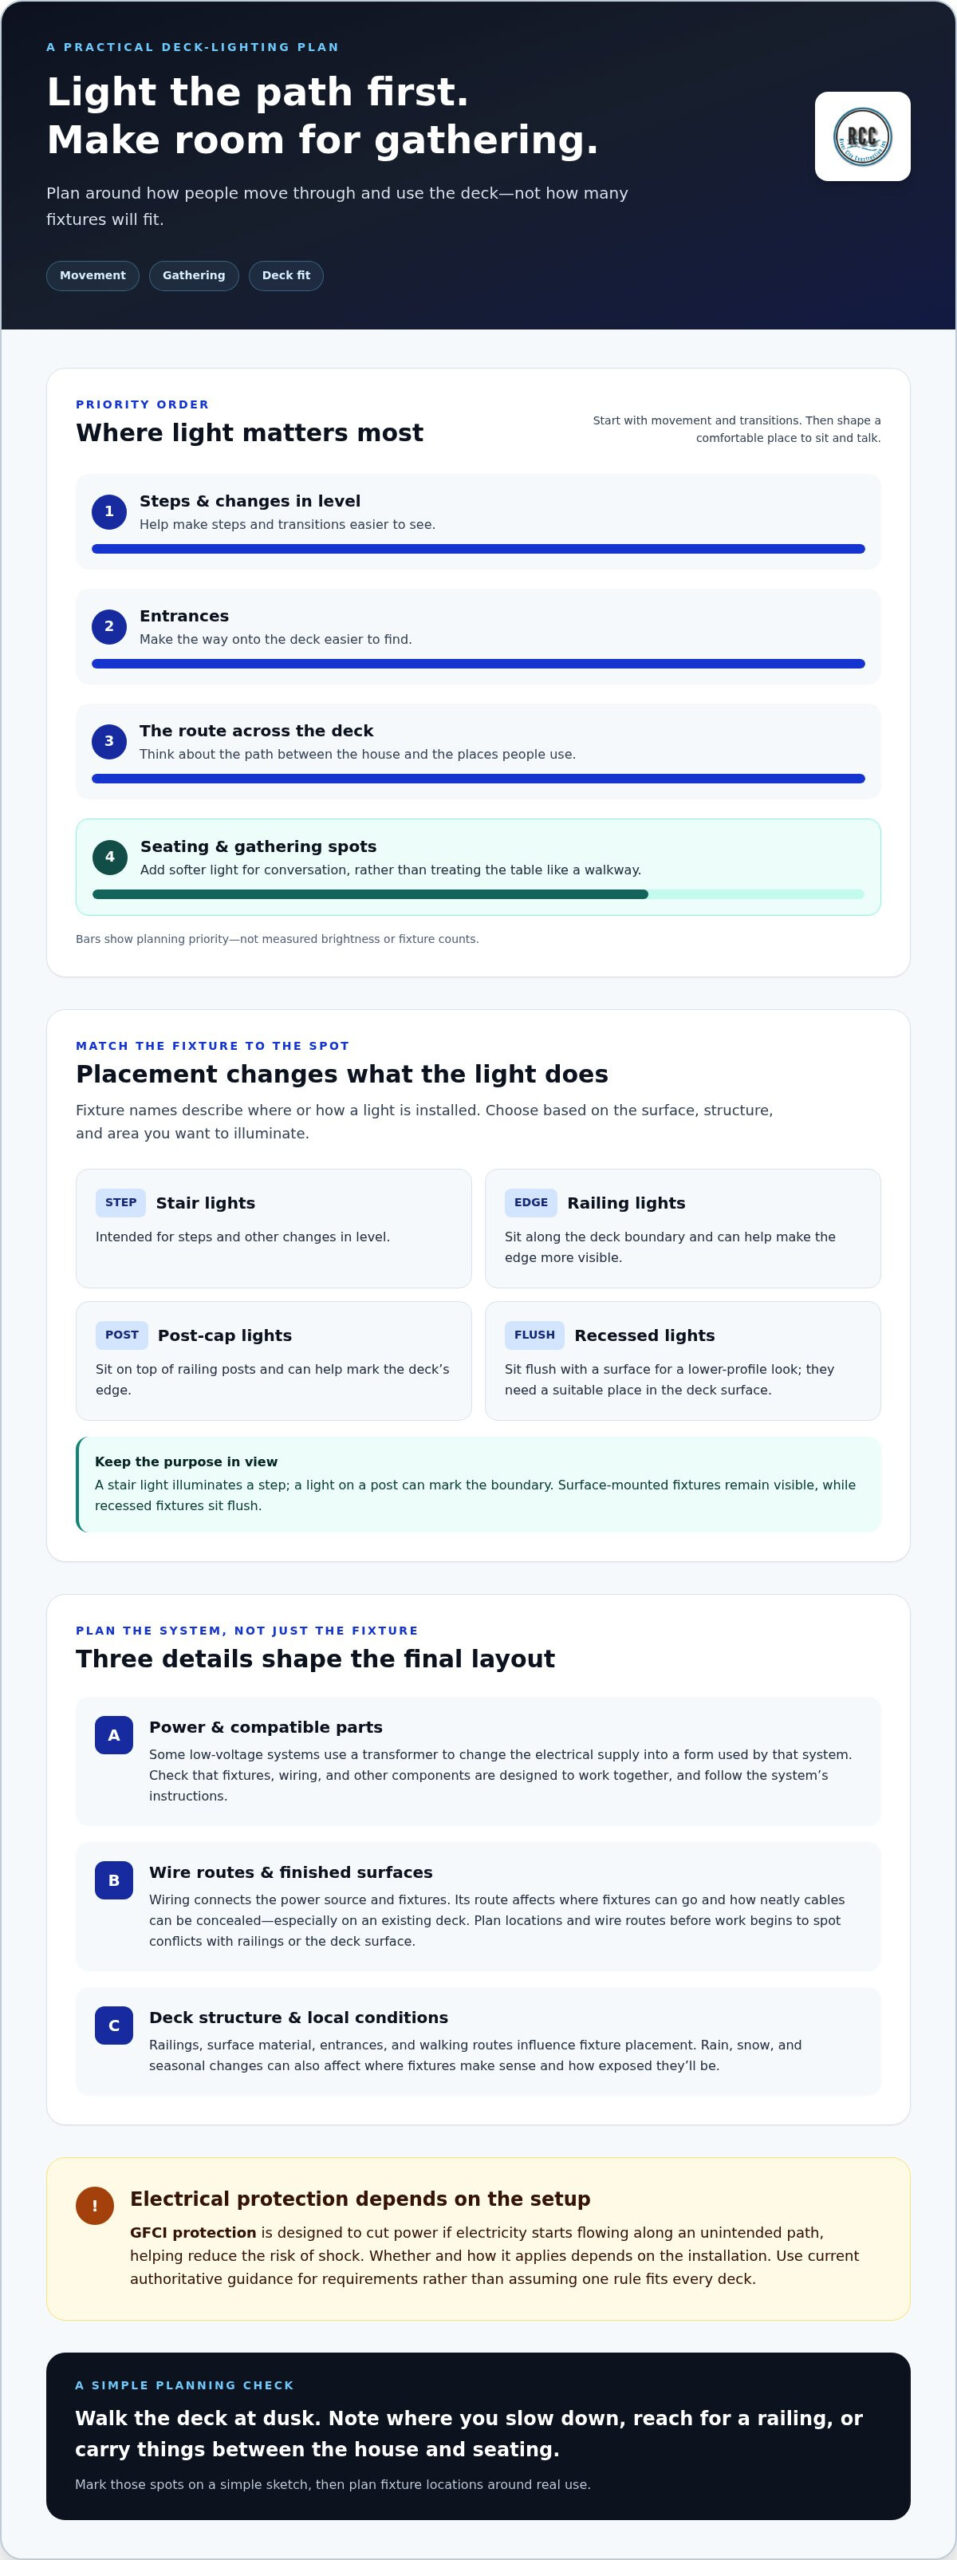
Start with places where someone could miss a transition or regularly passes through: stairs, changes in level, entrances, and the route between the house and the deck. Then consider where people sit. A path light helps someone follow a route; softer light near seating helps the area feel welcoming. These needs can guide fixture placement before you settle on a style.
Picture guests carrying drinks from the kitchen to an outdoor table. They need to see the doorway, walking route, and any steps along the way. The table has a different purpose: it should feel comfortable for conversation, not like a walkway. Separating these functions helps you plan around real use instead of adding fixtures by guesswork. For examples of outdoor lighting elements, see Landscape lighting components and types.
What should a Greater Boston homeowner consider?
Plan with local weather in mind. Rain, snow, and seasonal changes can affect where fixtures make sense and how exposed they’ll be. The existing deck matters, too: railings, surface material, entrances, and walking routes all influence possible placements. A fixture that fits neatly on one railing or surface may not work the same way on another.
Walk the deck at dusk and note where you naturally slow down, reach for a railing, or carry items between the house and seating. Mark those points on a simple sketch. This gives you a practical starting plan and helps distinguish useful lighting from decoration. As the project develops, keep local requirements in mind and use current authoritative sources for code or permit questions rather than relying on assumptions.
Lighting decisions can also connect to broader home improvements. If you’re planning several changes around the house, Boston kitchen remodeling from River City Construction Inc may be relevant to the wider project. For the deck itself, consider its construction and layout as part of the lighting plan, especially if changes to the structure or railing could affect fixture placement.
Deck lighting types and components: understand what each option does
Once you’ve identified where light would be useful, match fixtures and system components to the deck. LEDs are a common choice for deck lighting and are available in several fixture styles. Think about where the light needs to fall and whether you want the fixture to stand out or blend into the deck.
Fixture names describe where or how a light is installed, not necessarily the job it will do on every deck. A light near a step may help show a change in level, while one on a railing can mark the deck’s edge. The right fit depends on the layout and selected system. Check that fixtures, wiring, and other components are designed to work together, and follow the system’s instructions.
How do stair, railing, post-cap, and recessed lights differ?
Stair lights are intended for steps and other changes in level. Railing lights sit along the deck boundary, while post-cap lights are positioned on top of railing posts. Both can help make an edge more visible. Recessed lights sit flush with a surface instead of projecting above it, and may suit areas where a lower-profile fixture is preferred. Placement depends on the structure and material.
Picture each fixture in context. A light on a post may mark the boundary, while one on a stair illuminates the step itself. These options aren’t interchangeable: the fixture’s position affects what it illuminates. Consider the finished appearance, too. Surface-mounted fixtures remain visible, while recessed ones need a suitable place in the deck surface.
What are transformers, wiring, and GFCI protection?
Some low-voltage lighting systems use a transformer, a device that changes the electrical supply into a form used by that system. Wiring connects the power source and fixtures. Its route affects how neatly cables can be concealed and where fixtures can go, particularly on an existing deck.
GFCI protection means ground-fault circuit-interrupter protection. In plain language, it’s designed to cut power if electricity starts flowing along an unintended path, helping reduce the risk of shock. Whether and how it applies depends on the installation. Requirements can vary with the setup, so use current authoritative guidance rather than assuming one rule fits every deck.
Keep the selected system’s instructions close during planning. Fixture connections and compatible components can differ, so mixing parts based only on appearance may create avoidable problems. A clear plan for fixture locations and wiring routes also helps you spot potential conflicts with railings or the deck surface before work begins. If lighting is part of a larger deck update, you can discuss your deck project with River City Construction Inc.
Solar, low-voltage, or plug-and-play: compare deck lighting approaches
Different lighting approaches suit different layouts and preferences. A small deck with a few lights in open, sunny spots presents a different planning problem from a larger deck where fixtures need to follow several routes and boundaries. Compare how each option handles wiring and placement, and how much planning your deck lighting installation calls for.
| Approach | Wiring needs | Layout flexibility and planning |
|---|---|---|
| Solar | Lights use solar power, so the setup avoids wired connections between fixtures and a household power source. | Consider whether intended locations receive enough available light and suit the fixture’s placement needs. Check the product instructions for positioning. |
| Low-voltage | Fixtures connect through wiring, and some systems use a transformer to supply power. | A planned arrangement can connect multiple fixtures. Follow the manufacturer’s guidance on transformer capacity, wiring layout, and compatible components. |
| Plug-and-play | The system is designed for components to connect as part of its setup. Wiring needs depend on the specific system. | “Plug-and-play” describes a system category, not a promise that installation is effortless. Review the instructions and consider how the system fits the deck’s shape and fixture locations. |
The right approach depends on your deck’s layout and what you want the lighting to do. Consider the route lights must cover, where fixtures can go, and whether you’re comfortable with the wiring involved. The simplest-sounding option isn’t automatically the best match. The deck and selected system both matter.
When might solar deck lights suit the project?
Solar lights may appeal if you want to avoid wired connections in the lighting setup. Placement still matters. A spot with limited available light may not suit a solar fixture as well as a more open location. Look at the actual positions you have in mind and use the product instructions to guide placement, rather than assuming every area of the deck will work equally well.
When should homeowners consider a wired low-voltage system?
A wired low-voltage setup may be worth considering when you’re planning a coordinated arrangement of several fixtures. The system’s transformer capacity and wiring layout need to match its instructions. Manufacturer guidance explains how the components are meant to work together; it isn’t a substitute for professional installation advice when the work calls for it.
If lighting is part of a new deck or a broader deck alteration, consider both together. River City Construction Inc works on deck installation in Greater Boston. Homeowners planning a larger deck project can discuss the project with the team.
Plan deck lighting installation around layout, materials, and local conditions
A clear plan helps you make lighting decisions in the right order. Start with how the deck is used, choose possible fixture locations, consider the surface and structure, and then map the wiring. This sequence can reduce guesswork, especially on an existing deck where boards, railings, and access points already shape what’s practical. A simple sketch is enough to get started.
- Map how you use the deck. Note entrances, stairs, regular walking routes, seating, and gathering areas.
- Mark possible fixture positions. Add symbols to your sketch to show where light could serve each use.
- Review the materials and structure. Consider the deck surface, railings, and space available for fixture placement.
- Plan wiring routes. Work out how the selected system’s wiring could connect its fixtures while keeping the finished appearance in mind.
How can a homeowner sketch a useful lighting plan?
Draw the deck’s basic outline and mark its stairs, entrances, paths, seating, and gathering zones. Add proposed fixtures where they might help instead of choosing a fixture count first. Then imagine moving through the plan after dark: can you follow the route from the door to the seating area, and have you accounted for changes in level? Adjust the layout before selecting products.
How do existing deck materials affect installation?
Identify whether the deck is wood or composite, and note how the railing and surface are constructed. These details can affect where fixtures fit and whether wires can be tucked out of sight. Don’t drill or cut based on a sketch alone. Check the product instructions and understand the deck construction before changing finished materials.
For an existing deck, the plan should respect what’s already there. A neat wire route may follow an underside or sheltered edge, but the right path depends on the deck’s structure and the selected system. Don’t assume a route that looks discreet from above will be accessible or suitable underneath. If the deck needs alterations to make room for fixtures or wiring, consider those changes alongside the broader deck layout and construction.
Before installation, follow the chosen system’s instructions for fixture placement, wiring, and compatible components. Also account for applicable local requirements. These can depend on the project and setup, so don’t treat a general online layout as a substitute for current local guidance. Planning in sequence helps you spot decisions that may affect the finished deck before work begins. River City Construction Inc offers expert guidance to help ensure your project runs smoothly from start to finish.
Choose a professional deck lighting installation approach in Greater Boston
Planning where lights should go is a useful homeowner task. Installing them is a separate decision. A sketch can clarify what you want, but wiring, work with the household power supply, or changes to deck components may call for professional input. Treating planning and installation as different parts of the project helps you decide where your own work ends and where experienced help makes sense.
When is DIY planning different from DIY installation?
You can map the deck, note where lighting would be useful, and compare system types before installation begins. That planning doesn’t automatically mean wiring or fixture work is also a DIY job. Follow the chosen product’s instructions and applicable local requirements, and get professional input when the scope involves electrical work or structural changes to the deck.
A small change can affect more than appearance. For example, adding a fixture to a railing may involve altering a finished deck component, while wiring involves work beyond simply choosing a location. Think through the whole task before deciding it’s straightforward. If you’re unsure how a change affects the deck or its construction, pause before cutting, drilling, or routing wires.
The right approach also depends on the deck’s condition and the amount of work the lighting plan requires. If the deck needs repairs, a new railing, or a layout change to support your goals, consider lighting alongside that broader construction work. Coordinating decisions can keep fixture placement, access, and the finished design in view together.
What should a deck project conversation cover?
A useful project conversation starts with the deck itself: its current condition, materials, access points, and how your household uses it. Explain the effect you’re hoping for, such as clearer visibility along a route or a more inviting feel near a gathering area. These details help define the construction scope and show whether lighting decisions relate to deck changes. Broader outdoor-living plans can also shape the layout.
River City Construction Inc is a Greater Boston residential contractor offering deck installation. For homeowners considering a new deck or construction changes as part of a larger project, the scope can be shaped around the deck and the homeowner’s goals. Lighting can be part of the planning conversation without assuming every project needs the same fixtures or construction approach.
Bring a simple sketch, photos of the deck, and a short list of the changes you’re considering. That gives the discussion a practical starting point and helps distinguish the lighting plan from any deck alterations needed to support it.
Turn your lighting ideas into a deck plan
Your deck should work for the way you want to use it, not just look finished in daylight. Before moving ahead, think about which changes belong together: perhaps the deck layout needs an update, or you’re planning a new space where lighting can be considered alongside construction. A clear sense of your priorities can make the next project decision easier.
River City Construction offers deck installation and residential remodeling in Greater Boston. If your lighting plans are part of a broader deck project, a conversation can help shape the construction scope around your deck and goals. Homeowners can request a free quote. A practical deck lighting installation plan begins with understanding the space and the changes you want to make.
With a thoughtful plan, you can take the next step toward an outdoor space that feels comfortable and ready for evenings outside.
Frequently Asked Questions
Is deck lighting installation a DIY project?
Planning can be DIY, but installation depends on the system and work involved. Marking fixture locations is different from connecting wiring or altering a railing or deck surface. A homeowner may be comfortable following a product’s instructions for a straightforward setup, but electrical work or structural changes call for professional input. In Greater Boston, include applicable local requirements in your plan before starting.
Can solar deck lights work without wiring?
Yes. Solar deck lights can operate without wired connections to a household power source. Their usefulness depends in part on whether the intended location receives enough available light, so a shaded corner and an open railing may not be equally suitable. Check the fixture’s placement instructions and think about where it will sit during normal use, rather than choosing a location based on appearance alone.
What type of lighting is best for deck stairs?
Choose lighting made for stair or step placement, and consider how it will show the edge of each tread without obstructing the path. The exact fixture depends on the stair design and system you select. For example, a narrow stairway with a railing may need a different placement plan from broad steps opening onto a landing. Follow the fixture instructions when deciding where it belongs.
How do low-voltage deck lights work?
Low-voltage deck lights connect by wiring to a system that may use a transformer to supply power. The transformer and fixtures need to suit the same system, and the wiring arrangement must follow its instructions. Before choosing components, map where the lights will go and how the connections can reach them without disrupting deck access or appearance.
Can deck lighting be installed on an existing deck?
Yes, lighting can be planned for an existing deck, though the deck’s condition and construction affect the work. Wires may be harder to conceal after the surface is finished, and fixture placement must work with existing railings and access points. If the project also involves deck changes, homeowners in Boston, Winchester, Medford, Somerville, Cambridge, Belmont, Lexington, Concord, Wellesley, Newton, Wayland, and Natick can consider the lighting plan alongside that construction scope.
Do I need a permit for deck lighting installation in Massachusetts?
Permit requirements can depend on the work and the municipality, so don’t assume a lighting setup is exempt because it uses low voltage. Before installation, check current guidance with the local building department or electrical authority for the town where the home is located. This is especially important if the plan involves wiring or a connection to household power. Requirements can change, so rely on current local information.
How should I plan deck lighting for a wood or composite deck?
Start by identifying the deck material and considering how fixtures will attach and where wiring could run. Wood and composite surfaces may have different construction details, so don’t assume a fixture or wire route suits both. Check the selected system’s instructions and understand what lies beneath the surface before drilling or cutting. If you’re unsure how a change may affect the deck, get professional input first.