A coating can make a basement wall look protected without keeping all water out. Damp proofing basement walls is intended to slow moisture infiltration, while waterproofing addresses water intrusion more directly. The right approach depends on what’s causing the dampness, since a surface coating alone won’t resolve every source of moisture.
Damp proofing basement walls can be frustrating to research when stains or musty odors return after a quick fix. Start by distinguishing condensation from seepage: the cause determines whether you need to manage indoor moisture, repair an entry point, or improve drainage. This guide explains how damp proofing differs from waterproofing, how to spot common moisture paths, and why a coating alone may fall short. With a clearer picture of the problem, you can plan the right next step for your basement.
Key Takeaways
- Match the fix to the water’s entry point: seepage at the floor-wall joint may call for drainage, while damp air or surface moisture needs a different response.
- Cracks can let water bypass a coating. Understanding their size and pattern helps determine whether crack repair should come before any wall treatment.
- Use a foil test to help distinguish condensation on the room-facing surface from moisture moving through the wall.
- Tar- and asphalt-based coatings slow moisture rather than block every source of water, so don’t treat them as a complete solution.
- Look beyond the wall itself: roof runoff, soil moisture, indoor humidity, and new concrete can all contribute to basement dampness.
1. Damp Proofing or Waterproofing Foundation Walls?
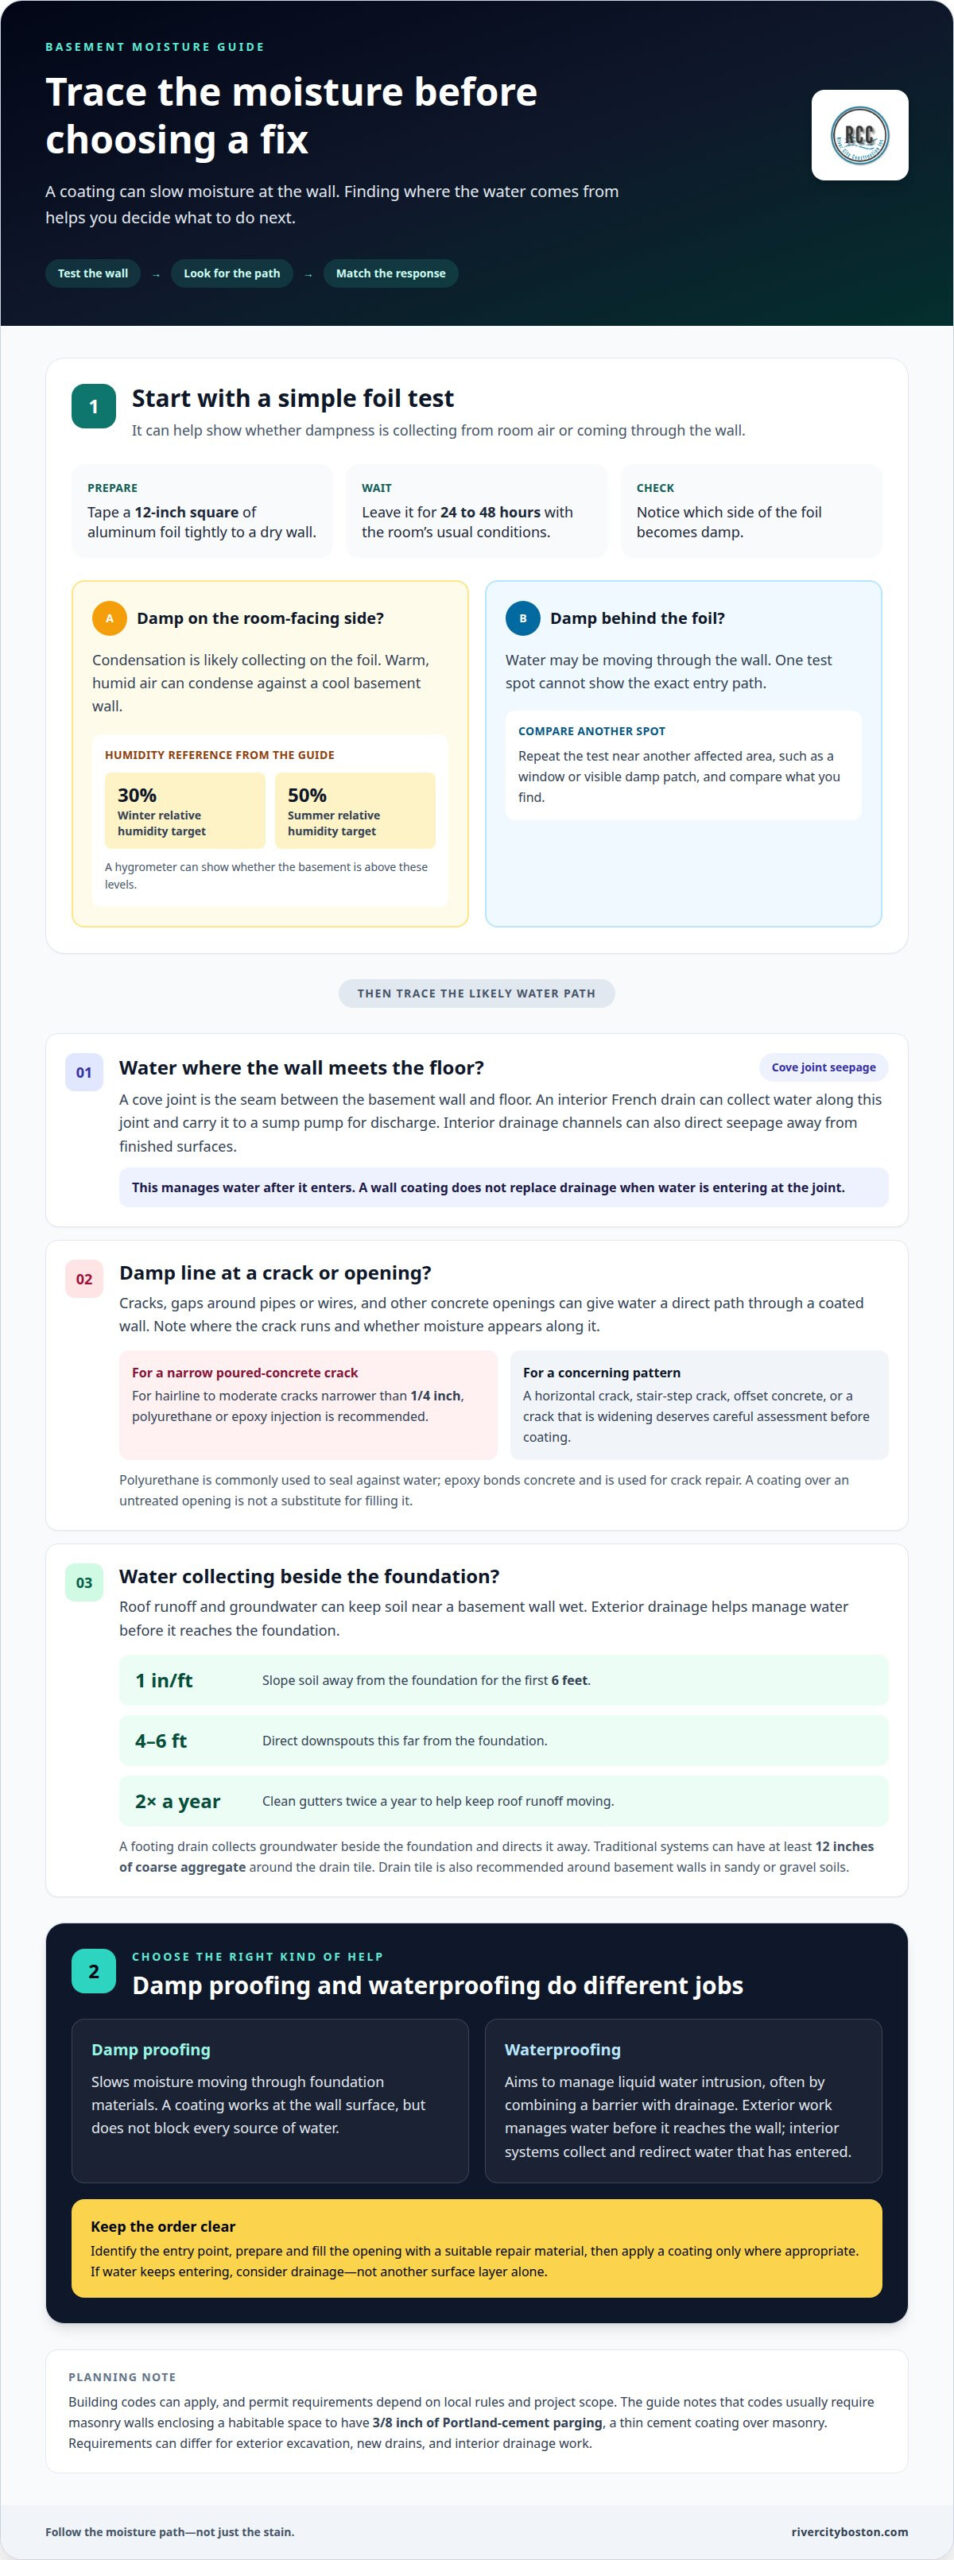
Damp proofing slows moisture moving through foundation materials. Waterproofing aims to manage liquid water intrusion, often by combining a barrier with drainage. The right approach depends on where water is getting in. Exterior work manages water before it reaches the wall; interior systems collect and redirect water that has already entered.
With cove joint seepage, water appears where the basement wall meets the floor. An interior French drain collects water along that joint and carries it to a sump pump for discharge. This manages water after it enters rather than sealing the exterior wall. Interior drainage channels work similarly, directing seepage away from finished surfaces.
Interior wall products can help manage moisture, but they serve different roles. A coating slows moisture at the wall surface; it doesn’t replace drainage when water enters at the cove joint. A dimpled air-gap membrane creates a channel behind the wall covering, directing water downward toward an interior drain. Some membranes can bridge a crack up to 1/4 inch, but they don’t repair its cause.
Outside, a footing drain collects groundwater beside the foundation and directs it away. The footing is the supporting base at the bottom of a foundation wall. Traditional systems can place drain tile beside or on top of this base, with at least 12 inches of coarse aggregate, or crushed stone, around it. Drain tile is also recommended around basement walls in sandy or gravel soils.
Surface drainage matters, too. Soil should slope away from the foundation by at least 1 inch per foot for the first 6 feet. Downspouts should discharge water 4-6 feet from the foundation. Cleaning gutters twice a year helps keep roof runoff moving. Together, these steps reduce water collecting beside a basement wall before it can reach the foundation.
Building codes can apply, while permit requirements depend on local rules and project scope. Codes usually require masonry walls enclosing a habitable space to have 3/8 inch of Portland-cement parging, a thin cement coating applied over masonry. Exterior excavation, new drains, and interior drainage work may have different requirements, so the location and planned work shape what applies.
2. How foundation cracks affect damp-proof coatings
A damp-proof coating forms a layer over concrete, but a crack creates a direct path through it. Water can travel through the opening and appear inside even when the surrounding wall is coated. Paint may hide a crack without filling it. For example, if a thin vertical line remains damp after coating, the crack itself needs attention, not another surface layer.
For hairline to moderate cracks narrower than 1/4 inch in poured concrete basement walls, polyurethane or epoxy crack injection is recommended. These materials fill the crack rather than simply cover its face. Polyurethane is commonly used to seal against water; epoxy bonds the concrete and is used for crack repair. The choice depends on the crack and the repair goal, so coating over an untreated opening is not a substitute.
Note where the crack runs and whether moisture appears along it. A damp streak beside a vertical crack suggests a different entry path from condensation spread across a cold wall. Also look for gaps around pipes, wires, and other concrete penetrations. A coating may leave a weak point if it stops at the edge of an opening. Sealing the gap and treating the surrounding surface are separate steps.
Crack shape helps describe the problem, but appearance alone does not establish its cause. A horizontal crack, a stair-step line in masonry, or visibly offset concrete deserves careful assessment before applying a coating. If a crack is widening or water returns after patching, another coat may hide the symptom while leaving the pathway open. A downspout releasing water close to the foundation can also keep the affected area wet.
Repairing concrete cracks and gaps works best as a sequence: identify the entry point, prepare and fill the opening with a suitable repair material, then apply a coating only where appropriate. This helps avoid hiding visible signs under a fresh finish. Sealing around a pipe, for example, will not fix a separate nearby crack. Treat each opening as its own potential water path, and consider drainage if water keeps entering.
For basement remodeling, crack locations and prior patches can shape wall finishes and room plans. A finished wall may cover a repaired area, but it shouldn’t conceal unresolved moisture. If you’re planning changes to the space, discuss your basement project as part of the overall plan, so repair needs and finish choices can be considered together.
3. Distinguishing condensation from water seepage with a foil test
A 12-inch square of aluminum foil can help identify whether moisture comes from room air or through the wall. Tape it tightly to a dry basement wall, then leave it in place for 24 to 48 hours. Keep the room’s usual conditions during the test, and note which side of the foil becomes damp.
If moisture appears on the exposed, room-facing side, condensation is likely collecting on the foil. Warm, humid air can condense against a cool basement wall, especially when indoor humidity is high. The suggested relative humidity target is 30% in winter and 50% in summer. A hygrometer can show whether the basement is above those levels.
If moisture appears behind the foil, between the foil and concrete, water may be moving through the wall. That can indicate seepage, but one test spot cannot identify the exact entry path. Repeat the test in another affected area, such as near a window or visible damp patch, and compare the results.
Water can enter through foundation cracks, pipe openings, a window well, the wall-floor joint, or the floor itself. A single wet spot after rain suggests a different pattern from moisture spread across a broad, cold surface. Note when and where dampness appears and whether it follows rainfall. These observations help distinguish a direct water path from condensation.
Damp proofing and waterproofing address different problems. Damp-proof coatings slow moisture moving through the foundation; they are not designed to keep all liquid water out. Waterproofing uses measures intended to manage water intrusion, such as an exterior membrane or drainage system. A membrane protects the outside face, while interior drainage collects water that has already entered.
Consider a waterproofing assessment when seepage returns after rain, water gathers at the wall-floor joint, or dampness continues behind the foil. The pattern can help establish whether the issue involves a crack, drainage, or the exterior. If the foil shows room-side condensation instead, focus first on indoor humidity and cold surfaces rather than treating the wall as a leak.
Waterproofing costs depend on access and the work involved. Exterior excavation, membrane installation, drainage changes, and concrete repairs each affect the project scope. A project-specific quote reflects those conditions, rather than a single price that fits every basement.
4. Limitations and failure of tar- and asphalt-based coatings
Painting a damp foundation wall can hide stains without stopping water entry. Sealing over moisture leaves the cause unresolved, so a coating may blister, peel, or fail as dampness continues behind it. Damp-proof coatings slow moisture infiltration; they do not keep all water out.
Bituminous tar is a thin barrier, not a repair for cracks or drainage problems. Once cured, tar damp-proofing is at most 10 mils thick, and its stated life expectancy is 18 months to 3 years. Foundation coatings can fail several years after construction, especially when water continues reaching the wall. A fresh layer inside won’t correct a damaged exterior coating or a water-entry path.
Interior coatings and membranes can be useful, but they have limits. They may address moisture at the surface without fixing its source. If dampness returns after painting, remove loose or failing material before applying another finish. Then determine whether seepage, condensation, or another moisture source is affecting the foundation wall.
A dehumidifier can reduce humidity in the room, but it doesn’t repair the foundation. Dehumidification isn’t a permanent solution, and running a unit can draw 20 to 30% more moisture through concrete. For example, a basement may feel drier while moisture still moves through the wall. That difference matters before covering the inside with finished materials.
Waterproof coating options vary by material and application. Spray-applied elastomeric membranes are flexible, rubber-like coatings that stretch over a surface. They’re commonly applied at 30 to 60 mils wet, then cure to a dry film thickness of 15 mils or more. Sheet membranes are 60 mils thick, with warranties usually no longer than 5 or 10 years. These systems need suitable preparation and don’t replace drainage when water collects beside the foundation.
For moisture that comes through a wall, a vapor retarder can limit water vapor moving indoors. Basement wall vapor barriers are heavy-duty polyethylene sheets, 6-20 mil thick. They manage vapor, not active water flow through a crack or joint. Selecting a coating, membrane, or vapor retarder therefore starts with the moisture source and wall condition.
Before painting, look for peeling material, damp patches, mineral deposits, and recurring water marks. Check whether grading directs water toward the foundation, then note where moisture appears indoors. If a coating keeps failing, another layer can hide the symptom while leaving the cause untouched. Address the water path before applying a new wall finish.
5. Common causes of damp basement walls
Water on a basement wall does not always come from a dramatic leak. Ground moisture, household activity, new concrete, and roof runoff can all contribute. The location and timing of damp patches offer useful clues: a wet strip after rainfall suggests a different cause from moisture appearing across a cool wall during ordinary indoor activity.
Start with water around the house. During a 1-inch rain, a 2,000-square-foot roof receives 1,250 gallons of water. If gutters overflow or downspouts discharge beside the foundation, runoff can collect near basement walls. A house should have at least one downspout per 50 linear feet of roof eave. Check where roof water goes before deciding to install an interior drainage system.
Ground moisture can also move through soil and concrete. Moisture tends to move from the wetter ground toward the drier basement air. The force driving this movement is often twice as strong in the ground as inside the basement. Water can also rise through tiny spaces between soil grains. This upward movement ranges from 1 to 8 feet in sand, 12 to 16 feet in silt, and 12 to 20 feet in clay.
New concrete brings its own moisture. In a typical house, new concrete can contain 0.2 gallons of moisture per square foot of wall and 0.1 gallons per square foot of floor. A new home may take many months or even years to reach balance with its surroundings. Dampness in a newer basement may reflect drying concrete, but wet cracks or recurring seepage still need attention.
Everyday activities add water vapor indoors. Showering, laundering, and cooking together add 3-5 gallons of moisture per day. If humid air meets a cool foundation wall, condensation can form on its surface. For example, moisture spread across a wall differs from a narrow wet trail emerging from a crack. That pattern helps separate indoor humidity from water entering through the foundation.
Foundation movement can create new water entry paths. Walls in newly built homes may show stress, including cracks and crevices, as early as two years after construction. Groundwater can pass through a crack in concrete, while a gap around a pipe offers another route. Damp proofing basement walls works best when you identify the source first, whether that means managing runoff, addressing a crack, or controlling indoor moisture.
River City Construction: Basement Remodeling
River City Construction Inc. helps homeowners plan basement remodeling after they understand what is causing moisture and what needs attention. If seepage, condensation, or damaged finishes have changed how you use the space, that assessment can guide decisions about layout, materials, and remodel timing. Addressing moisture concerns before choosing finishes helps the project plan reflect the basement’s actual conditions.
A basement remodel can make underused space more practical, with finishes and room functions chosen around your goals. River City Construction Inc. also offers kitchen remodeling, bathroom remodeling, and accessory dwelling unit design-build services for other home projects.
Contact River City Construction Inc. to discuss your basement remodeling plans.
Plan a Basement That Works for You
Before choosing finishes, consider how you want the basement to serve your household. A quiet work area, guest space, and everyday family room each have different needs for lighting, storage, and layout. This gives the moisture assessment a practical purpose: it connects work on the walls with the room you want to create.
For damp proofing basement walls, turn your observations into a clear project plan. Note the areas that concern you and how you hope to use the space. Those priorities can guide decisions about repairs, finishes, and the order of work. A measured approach helps you move forward with clarity instead of relying on a quick cosmetic fix.
A well-planned basement can become a more comfortable, useful part of your home. Start with the space you want, then work toward it one considered decision at a time.
Frequently Asked Questions
2. How Much Does it Cost to Waterproof a Basement?
Waterproofing costs depend on the home and the work required. Key cost factors include exterior access, the amount of excavation, drainage run length, and whether cracks or wall damage need repair. Interior drainage and an exterior membrane involve different work, so the project scope matters more than a generic estimate.
3. The Foil Test: Is It Seepage or Condensation?
A foil test offers a simple clue: tape a 12-inch square of aluminum foil to a dry wall, then leave it for 24 to 48 hours. Moisture on the room-facing side points toward condensation; moisture behind the foil suggests water may be moving through the wall. Try the test near a damp patch and compare it with a drier area. The result helps narrow the cause, but doesn’t locate a leak by itself.
4. What is the easiest waterproofing method?
The simplest first move is often reducing water that collects beside the foundation. Keep gutters clear and direct downspouts away from the house; soil should slope away by at least 1 inch per foot for the first 6 feet. These surface steps can reduce runoff near the walls, but they won’t fix active seepage through a crack or joint. If water still enters, the remedy needs to address that route.
5. What causes damp basement walls?
Dampness can come from outdoor runoff, groundwater, cracks, indoor humidity, or moisture in new concrete. Timing and location help distinguish these causes. A damp streak after rainfall may point to water collecting outside, while moisture across a cool wall may come from condensation. New concrete can also release moisture as it dries. Note whether the problem follows rain, appears near an opening, or affects several wall areas.
6. How can I tell if basement walls need damp proofing or waterproofing?
Look at how water appears and where it gathers. A persistent damp feeling without visible water may call for moisture control; active seepage, puddles, or water tracking from a crack needs a solution that handles liquid entry. A 12-inch foil test can help distinguish condensation from moisture behind the wall surface. Also note whether the signs worsen after rain, since that pattern can help identify an exterior water source.
7. How much does basement wall damp proofing cost in the United States?
The price depends on the project and its scope. Cost factors include wall area, concrete condition, surface preparation, access, and whether cracks or drainage also need attention. Coating an accessible wall differs from work requiring excavation or interior drainage. For homeowners in Boston, Winchester, Medford, Somerville, Cambridge, Belmont, Lexington, Concord, Wellesley, Newton, Wayland, and Natick, these details shape the project; one standard figure would not reflect every foundation.
8. Can I damp proof basement walls myself, or should I hire a contractor?
You can observe and document damp areas, but recurring seepage, cracks, or water at the floor-wall joint need closer assessment before you apply a coating. Surface paint may cover a stain without addressing its source. An assessment can consider the moisture pattern, wall condition, and drainage needs, then help determine whether repair or remodeling work should follow. Note rainfall, location, and when moisture appears to make the assessment more useful.