A successful basement home gym conversion in Somerville starts with a practical assessment of ceiling clearance, moisture, layout, and airflow. Plan for the workouts and equipment you’ll actually use, and allow at least 8 feet of clearance for overhead presses, pull-ups, and barbell work held overhead. The right layout makes exercise convenient without crowding the rest of the basement.
A basement home gym conversion in Somerville can bring workouts closer to home, but it takes more than clearing a patch of floor. Lighting, durable flooring, ventilation, and climate control all help create a comfortable space that works well day after day.
This guide covers how to assess your basement, fit equipment around ceiling height and traffic flow, choose suitable flooring, and plan lighting and airflow. Working through these decisions in order helps you shape a practical workout space around your routine and your home.
Key Takeaways
- Map workout zones around the equipment you’ll use most, leaving a clear path to move safely between them.
- Choose flooring based on the workout area’s cushioning, durability, and sound-control needs.
- Layer natural, overhead, and task lighting to make equipment and movement areas easier to use.
- Plan airflow and humidity control alongside heating and cooling for a more comfortable gym year-round.
- Bring the layout, flooring, and comfort decisions together before remodeling so the finished space supports your routine.
Basement ceiling-height limits and equipment fit
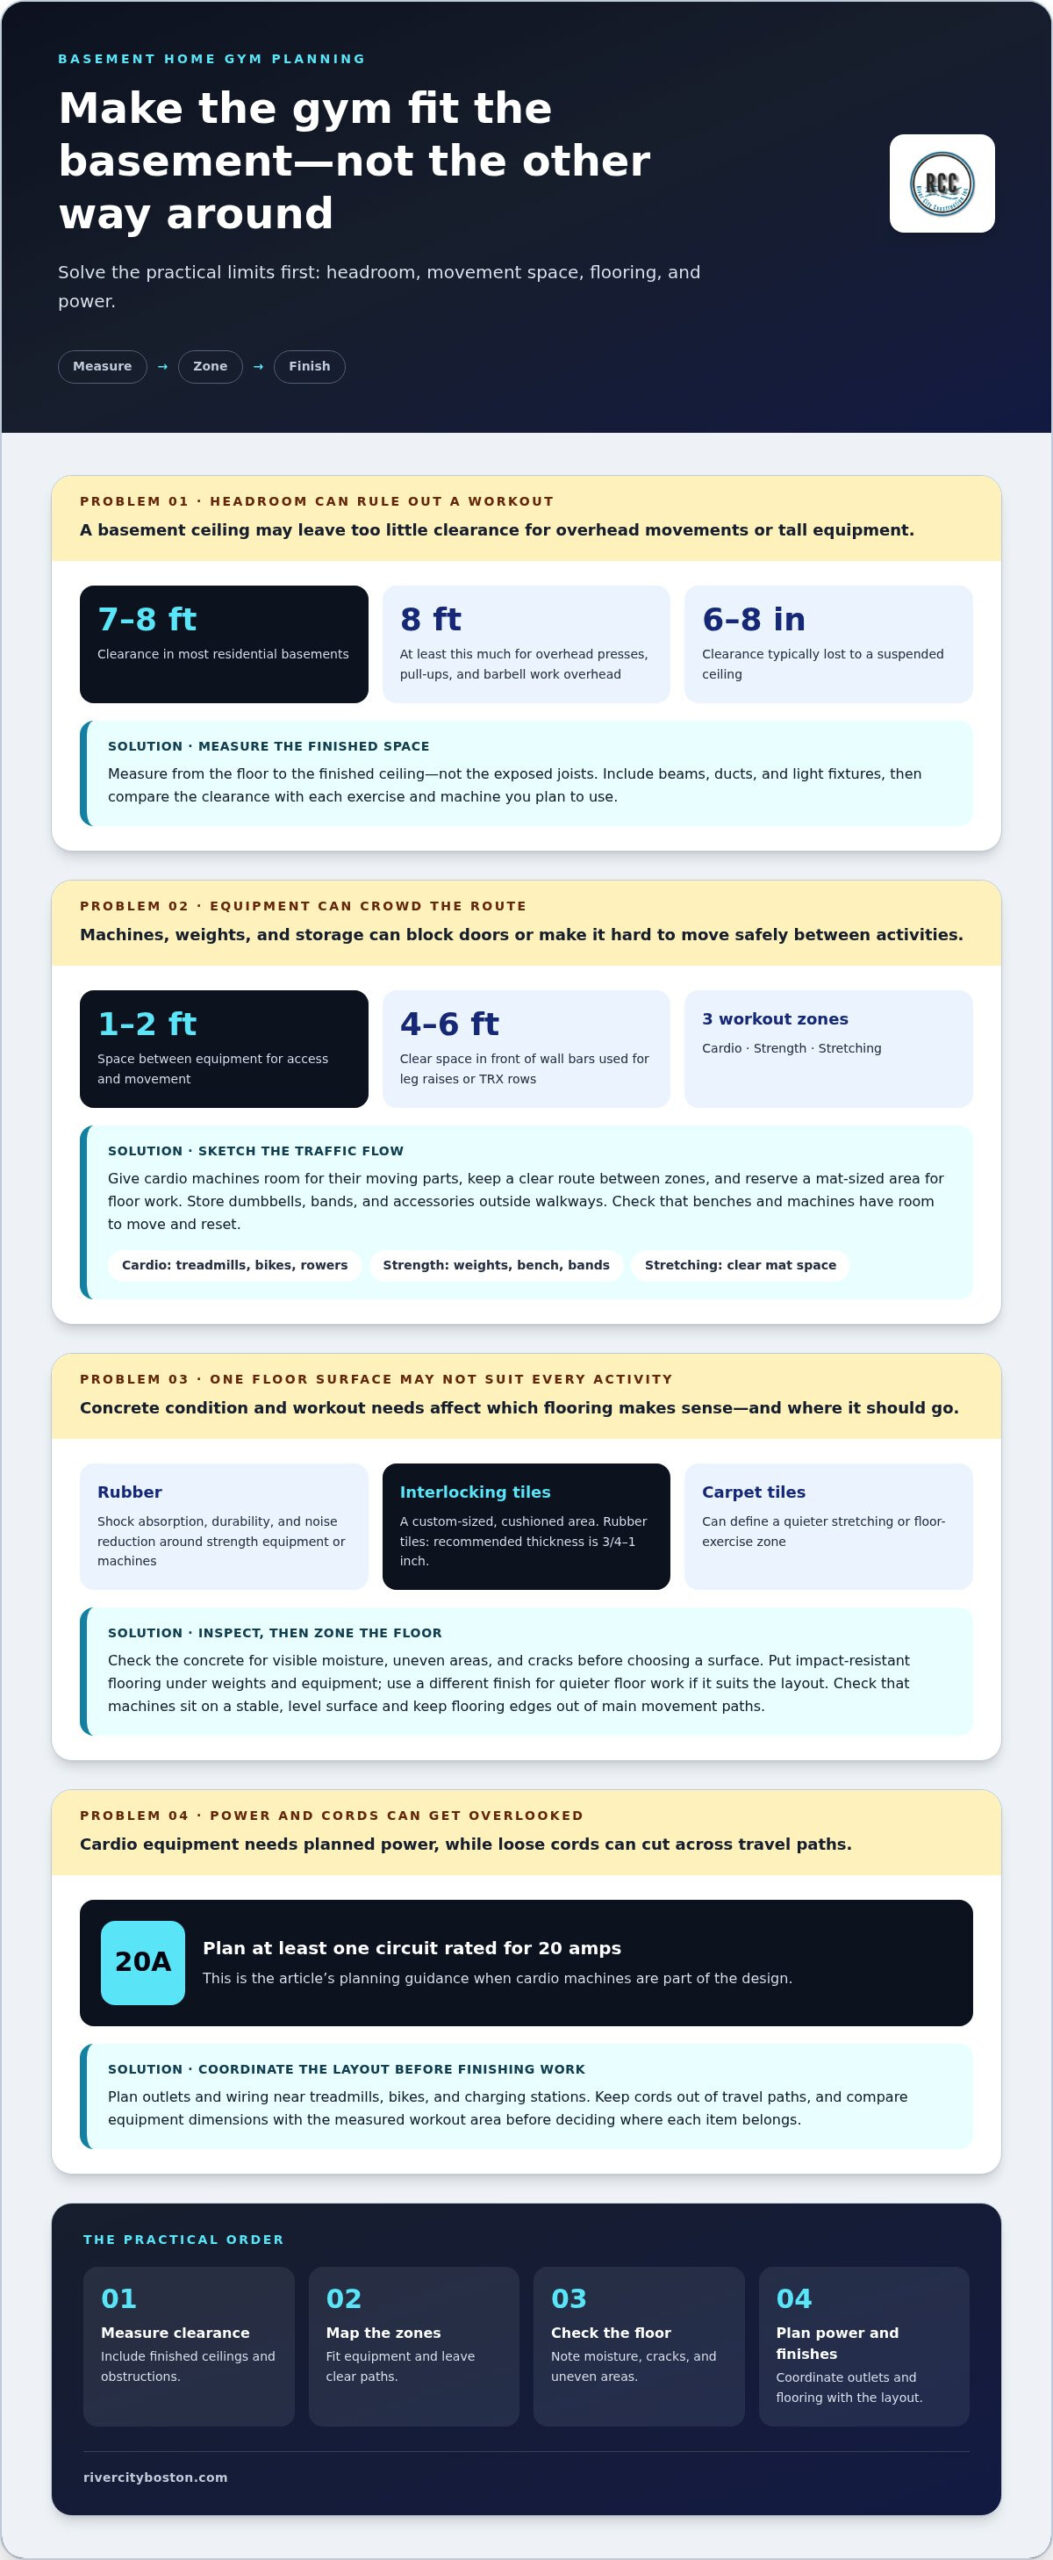
- Measure floor-to-ceiling clearance before choosing equipment. Most residential basements have 7 to 8 feet of clearance, while overhead presses, pull-ups, and barbell work held overhead require at least 8 feet. A suspended ceiling typically reduces gym clearance by 6 to 8 inches, so measure below the finished ceiling rather than the exposed joists. Include beams, ducts, and light fixtures in your measurements. This first step helps you rule out movements or machines that could crowd the available headroom.
- Divide the workout space into cardio, strength-training, and stretching zones. Place treadmills, stationary bikes, ellipticals, or rowing machines where they have room to move without blocking a doorway or another station. Set dumbbells, a weight bench, resistance bands, or a multi-functional home gym machine in the strength area. Reserve a mat-sized spot for stretching, yoga, or floor exercises. A simple floor sketch can show whether there’s a clear route between zones.
- Allow access around every machine before settling on its position. Leave one or two feet of space between equipment so you can approach, adjust, and move away without squeezing through. For wall bars used for leg raises or TRX rows, a bodyweight pulling exercise using suspension straps, preserve 4 to 6 feet of clear space in front. Check the equipment’s height and movement path against ceiling beams, too. For example, a rowing machine needs room for its sliding seat, while a bench needs space to reposition weights.
- Choose strength equipment based on ceiling height and the exercises you plan to do. Dumbbells and resistance bands are easier to use in spaces with limited clearance than overhead barbell movements. A weight bench supports a range of exercises, but leave enough room to lift and set down weights safely. Multi-functional machines combine several exercises in one footprint, which can be useful when floor space is limited. Compare each item’s dimensions with your measured workout area before deciding where it will go.
- Plan storage and power as part of the equipment layout. Reserve a defined spot for dumbbells, bands, and accessories so they don’t spill into walkways or stretching spaces. If your design includes cardio machines, budget at least one circuit rated for 20 amps of electrical current. Plan outlets and wiring near treadmills, bikes, and charging stations, keeping cords out of travel paths. In a basement home gym conversion in Somerville, these decisions are easiest to coordinate on the layout before finishing work begins.
Choosing rubber, interlocking, or carpet-tile flooring
Assess the concrete first, then match the flooring to your machines and workout zones. For a private home gym in Somerville, local requirements depend on the planned work and how the basement will be used. Consider construction, exits, and building systems as part of the project, rather than treating them as flooring decisions.
Assess the Concrete Basement Floor
Inspect the concrete before choosing a finished surface. Look for visible moisture, uneven areas, or cracks that could affect how flooring sits or fits together. Concrete can support heavy gym equipment, but its condition still matters when you select a covering. Mark where machines and workout zones will go, then note any floor concerns in those areas. This makes it easier to compare materials and plan the installation.
Choose Impact-Resistant Flooring
Match the surface to the workouts planned for each part of the basement. Rubber flooring offers shock absorption, durability, and noise reduction, useful qualities around machines or strength-training equipment. Interlocking foam or rubber tiles can create a custom-sized, cushioned workout area. For interlocking rubber tiles, use the recommended 3/4-inch to 1-inch thickness. That choice gives you a defined surface without automatically covering every part of the basement.
- Divide the floor by activity before deciding how much material to install. Use rubber beneath strength equipment or in areas where you may handle weights, then consider carpet tiles for a stretching zone with less equipment movement. Interlocking tiles can define a compact mat area, so you don’t have to cover the entire concrete floor. This approach lets the finished layout serve different activities without treating every square foot alike.
- Check how flooring edges meet doorways, storage, and machine feet. A treadmill or exercise bike needs a stable, level surface, while a stretching area benefits from a clear, cushioned floor. Keep tile seams outside main movement paths where possible. For carpet tiles, plan boundaries around the workout zone so machines don’t sit partly on one surface and partly on another.
- Compare maintenance and replacement needs before choosing one material for the whole room. Rubber can suit high-use zones where impact and noise matter; carpet tiles can define a quieter area for floor exercises. Interlocking tiles offer flexibility for a custom-sized workout space. Place mirrors and machines on your layout first, then measure the exposed areas that need coverage. A floor plan helps avoid buying material for spaces that won’t support your routine.
Assessing basement layout, lighting, ventilation, and structural conditions
Plan the conversion in stages: assess the basement, map workout zones, prepare the space, complete construction, and finish with a walkthrough. This sequence connects structural conditions, movement, and lighting before the gym takes shape.
- Inspect the basement for structural concerns and moisture before planning finishes. Look for visible signs of dampness and note support beams that may affect equipment placement or movement. Measure ceiling clearance in different parts of the room, since a beam or low section can limit where you exercise. Most residential basements have 7 to 8 feet of clearance, so plan the project around the space you actually have.
- Sketch a functional layout around the activities you’ll do most. Divide the available spaces into cardio, strength-training, and stretching zones, then account for household traffic through the basement. Place cardio equipment where it won’t obstruct a regular path, and keep clear space near the workout area for moving between exercises. For wall-bar exercises such as leg raises or TRX rows, which use suspension straps for bodyweight pulling, allow 4 to 6 feet of clear space in front.
- Plan lighting in layers rather than relying on a single ceiling fixture. Basements typically measure below 100 lux, a unit that measures light levels, before gym lighting is added, while a home gym should target 300 to 500 lux at floor level. Use natural light where available, overhead lighting for general visibility, and task lighting near workout zones. Cool-white to daylight lighting in the 4000K to 5000K range can help make equipment and floor areas easier to see.
- Match each lighting choice to a specific part of the layout. For example, place task lighting near the strength-training area so you can see weights and equipment clearly. Check for shadows from beams, machines, or storage before deciding where fixtures belong. Mirrors can make the workout space appear larger and help you check your form, but position them to avoid reflecting overhead glare into your eyes.
- Follow a clear sequence: assessment, design and preparation, construction, then a final walkthrough. During preparation, bring structural notes, the equipment plan, and the lighting layout together. At the walkthrough, inspect the workout spaces, confirm that light reaches the floor and movement areas, and check the usual route through the basement for obstructions. This review helps catch layout issues before regular workouts begin.
Heating, ventilation, air conditioning, fans, and dehumidifiers
Plan airflow, humidity control, and heating or cooling before finishing the gym. Together, these choices help manage basement moisture and keep exercise comfortable through changing seasons.
Assess Basement Ventilation and Humidity
Check for dampness and plan how air will move through the basement. To test the concrete floor, tape a 12-inch square of plastic in place for 24 hours. Moisture beneath the sheet can signal that humidity management needs attention before flooring goes down. Include suitable moisture barriers and humidity control in the project plan, especially where rubber flooring or workout equipment will cover the floor.
Plan Heating and Cooling
Review how the basement’s heating, ventilation, and air conditioning (HVAC) can support exercise throughout the year. Basements are naturally cooler, which may feel comfortable during workouts, but temperatures can still vary with the season and the home’s setup. Plan HVAC adjustments around how you intend to use the gym instead of assuming the existing system will keep every area comfortable.
- Map airflow around the equipment before finalizing its position. A treadmill or stationary bike can make an exercise area feel warm, so avoid placing workout stations where they block air circulation. Consider how air enters and moves through the room, then plan fan placement to improve circulation. If the space suits a ceiling fan, it can help keep the gym cool during intense workouts.
- Choose humidity controls based on the basement’s moisture conditions. If the room tends to be humid, a dehumidifier may help manage moisture alongside planned barriers. Position it so it serves the workout space without obstructing movement or access to machines. Keep humidity planning connected to flooring decisions, since moisture control supports the long-term condition of the finished basement.
- Test your comfort plan under different workout conditions before treating the layout as complete. Notice whether the room feels stuffy during exercise, air reaches the cardio zone, and the temperature stays comfortable. Adjust fan placement or HVAC settings to address what you observe. For example, if a fan cools one area but leaves another stagnant, reposition it to improve circulation throughout the gym.
- Coordinate moisture barriers, dehumidification, HVAC adjustments, and fans as parts of one plan. A dehumidifier addresses humidity, heating and cooling help manage temperature, and fans support air circulation. These functions work together, but none replaces the others. Review each decision alongside the workout layout, flooring, and equipment positions so the finished basement supports regular exercise without trapped air or unmanaged moisture.
Convenience and value of a basement home gym
Permit needs for a private home gym in Somerville depend on the work involved. Setting up an exercise room differs from changing the structure, electrical wiring, or heating and cooling systems. Plan around the actual conversion rather than assuming every setup follows the same process.
- Start with the routine you want the basement to make easier. List the activities you’ll use regularly, such as treadmill workouts, strength training, or yoga. Then consider when you’ll exercise and how household members use the basement at those times. If a laundry area shares the room, for example, keep a clear route to it. A convenient layout supports workouts as well as everyday household movement.
- Decide whether the project is a simple equipment setup or a broader transformation. Moving in a stationary bike and yoga mat differs from finishing walls, adding lighting, or changing electrical and HVAC systems. Write down the planned work, including flooring, storage, and any changes to the room. This list gives you a practical basis for understanding what the conversion involves before work begins.
- Plan for household comfort as well as personal fitness. Sound insulation can help keep workouts from disturbing the rest of the home, particularly when a cardio machine sits below a bedroom or living area. Choose rubber flooring where impact and noise reduction matter, and place equipment with the household’s usual paths in mind. These choices help the gym fit into the basement instead of taking it over.
- Consider how the finished space can serve more than one type of workout. A clear stretching area can also support yoga or mobility exercises, while flexible storage keeps smaller accessories accessible. Mirrors can make the room feel larger and help you check your form. A basement gym is more useful when its layout can adapt as your routine changes without blocking other uses of the basement.
- Consider home value carefully, without treating a gym as a guaranteed financial return. A finished basement may contribute to the home’s overall appeal, but the value of a personal gym depends on how well it suits the household and the space. Prioritize durable finishes, functional lighting, and a layout that works for daily life. These practical choices make the room easier to enjoy now and more broadly usable later.
Permit needs depend on the work involved. Setting up exercise equipment differs from finishing the basement or changing its structure, electrical wiring, or heating and cooling systems. Plan around the specific scope of your project.
Requirements depend on the scope of the conversion, especially if it changes the basement’s structure, electrical wiring, or heating and cooling systems. Consider applicable zoning, building, and fire code requirements as you plan the work.
River City Construction: Kitchen Remodeling
River City Construction Inc can turn an unfinished basement into a functional home gym through its basement remodeling service. Bring together your layout, equipment needs, flooring choices, lighting, and climate-control plans when you’re ready to move from ideas to construction. This is a practical next step for projects that involve more than placing exercise equipment, such as finishing the room or coordinating changes across the basement.
If you’re planning a broader home update alongside the gym, River City Construction Inc also offers kitchen and bathroom remodeling. Share your goals and how you want your home to work for your household, then discuss a clear path for the project.
Contact River City Construction Inc to discuss your basement remodeling plans.
Make Your Next Step a Clear One
Before settling on a final plan, picture an ordinary week in the space. Which workouts would you choose after a long day, and what would make it easy to begin? A gym that fits your real routine is more likely to become a useful part of your home than a room reserved for occasional plans.
Give yourself time to consider how your needs may change. Your preferred equipment or schedule could shift, so a flexible room may serve you longer than a layout built around one narrow routine. Focus decisions on how you want to use the space, and you’ll have a stronger starting point for the work ahead.
If you’re ready to turn your basement home gym conversion in Somerville into a practical project, share your goals and the changes you’re considering. A clear first conversation can help you move forward with confidence.
Your future workout space starts with a plan that fits your home.
Frequently Asked Questions
What are Somerville basement ceiling height and egress requirements for a home gym?
For exercise planning, allow at least 8 feet of clearance for overhead presses, pull-ups, and overhead barbell work. That’s a workout clearance guideline, not an egress measurement. Egress means a route people can use to exit the basement. Most residential basements have 7 to 8 feet of clearance, so measure below finished ceilings and around beams. Keep the exit route clear, and treat changes to it as a project-specific building-code question.
How can a Somerville basement gym be insulated and ventilated to control moisture and mold?
Address moisture before closing walls or covering surfaces. Plan suitable moisture barriers and humidity control, then consider how air will circulate during exercise. If the basement tends to feel humid, a dehumidifier may help; HVAC adjustments and fans can support airflow and comfort. These steps help manage damp conditions, but they don’t replace fixing an active water source or addressing existing moisture damage.
What flooring is best for a basement home gym, and how much does it cost?
Choose flooring based on the workout area and equipment: rubber suits zones where impact, durability, and noise reduction matter, while interlocking tiles can define a cushioned area. Carpet tiles may suit a separate stretching space. Flooring costs depend on the area, material, and floor preparation; project pricing is provided after a quote request. A floor plan helps estimate how much coverage each workout zone needs.
How can basement ceiling height and structural limits affect gym equipment choices?
Low ceilings, beams, and support posts can limit equipment height and movement, so compare those obstacles with each machine’s footprint and use. Overhead lifting needs more clearance than floor exercises or resistance-band work. Concrete basement floors can support heavy gym equipment, but inspect the space for structural issues before placing machines. For example, position a bench where a beam won’t interfere with lifting.
Does a basement home gym conversion require electrical or plumbing upgrades in Somerville?
Electrical planning depends on the equipment and work involved. A gym with planned cardio machines should budget at least one 20-amp circuit, meaning a dedicated electrical path designed to supply power at that rating. Position outlets to keep cords out of walking paths. A workout setup alone doesn’t establish a plumbing need; that depends on whether the project includes water-using fixtures. Include wiring and fixture changes in the initial plan.
What are the risks of converting an older Somerville basement into a home gym?
A basement’s age alone doesn’t determine whether it suits a gym; its current condition does. Look for moisture problems, structural concerns, uneven concrete, low ceilings, and support beams that could affect movement or equipment placement. A machine may fit on the floor yet interfere with a beam during use. Account for these conditions in the layout and preparation plan before finishing the space.