A practical plan for avoiding home remodeling mistakes starts before work begins: settle fixture locations, understand the project sequence, and set aside a 10-20% contingency for unexpected expenses. Clear decisions up front can help prevent late changes that disrupt the schedule and add costs. The goal isn’t to predict every surprise, but to make room for the ones that can emerge once work is underway.
It’s easy to focus on finishes and the final look, but the details behind the walls matter just as much. A misplaced outlet, an overlooked permit, or a late material delivery can complicate an otherwise well-planned remodel.
This guide covers practical ways to organize a home project and keep costs on track. You’ll learn how to plan fixture placement, review contractor credentials and insurance, budget for labor, account for permits and safety, and allow time to choose materials. Each step helps you make informed decisions before changes become difficult or expensive.
Key Takeaways
- Map fixture locations and clearances before work begins to reduce disruptive changes later.
- Review a contractor’s credentials, insurance, references, and experience with older-home hazards.
- Build labor and unexpected conditions into your budget before committing to the project plan.
- Understand the safety steps and permit requirements that apply to your renovation before demolition starts.
- Allow time to choose and order materials so selections and deliveries support the work schedule.
1. Planning fixture placement before rough-in work
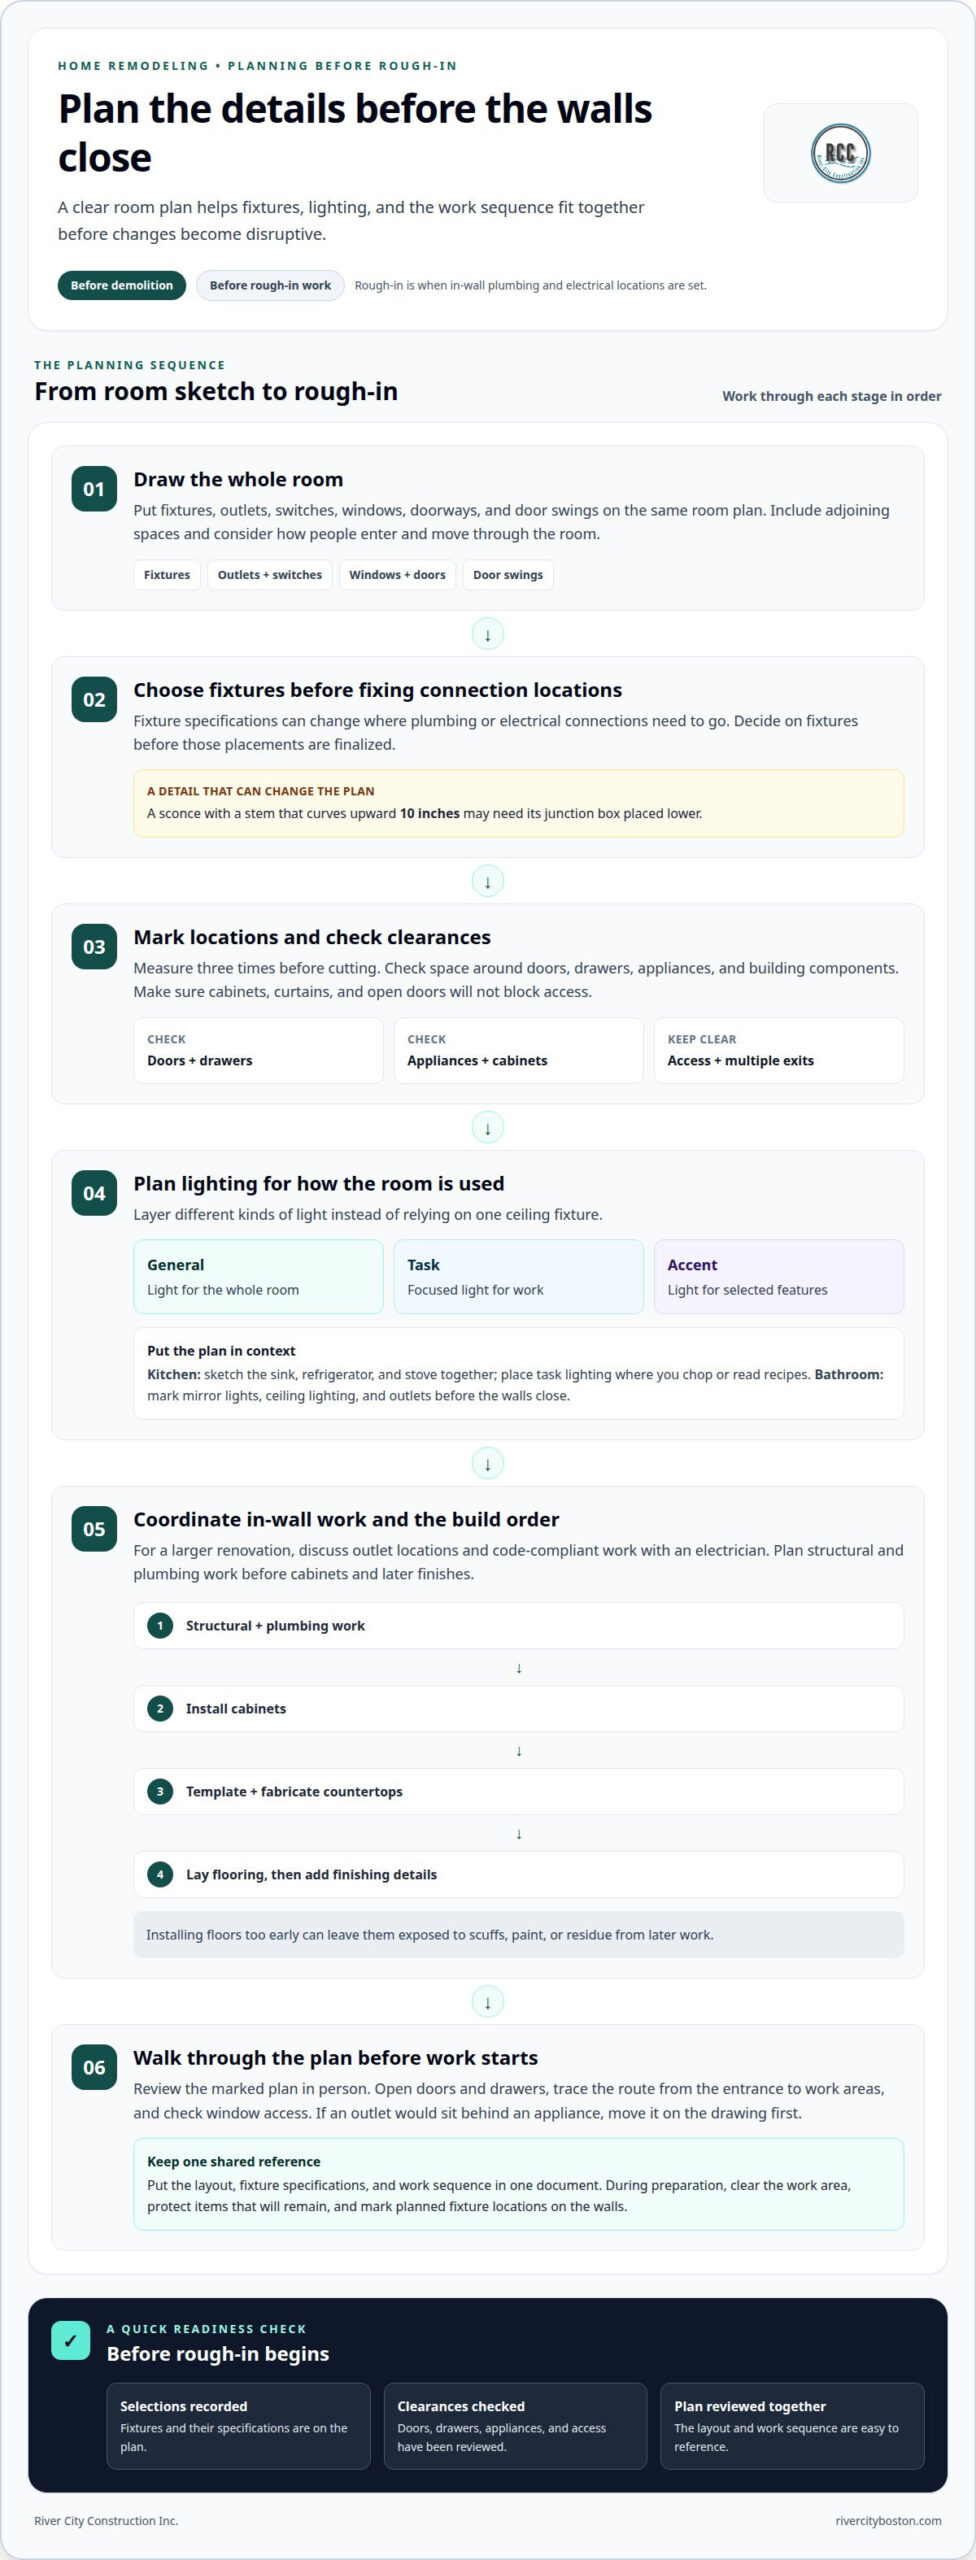
Rough-in work is the early stage when in-wall plumbing and electrical locations are set. Before it begins, mark each fixture, outlet, and switch on a room plan. Measure three times before cutting, then check clearances around doors, drawers, appliances, and building components. Fixture specifications can change the height or location of plumbing and electrical connections. Choose fixtures before those placements are finalized, so finished drywall doesn’t need reopening. For example, a sconce with a stem that curves upward 10 inches may need its junction box placed lower.
Plan lighting in three layers: general lighting for the whole room, task lighting for focused work, and accent lighting for selected features. In a kitchen, sketch the sink, refrigerator, and stove together, then consider how people will move between them. Place task lighting where you’ll chop or read recipes, not just where a ceiling fixture looks balanced. In a bathroom, mark mirror lights, ceiling lighting, and outlets on the plan before the walls close.
Windows and doorways also affect the layout. Draw each window, door swing, and planned fixture on the same floor plan, then check that cabinets, curtains, and open doors won’t block access. Consider the room from its entrance and adjoining spaces. Plan doorways with the full floor plan in mind and preserve multiple exits. A simple drawing can reveal a traffic pinch point before construction makes it permanent.
For a larger renovation, plan electrical and plumbing work inside walls early. Walk through the house with an electrician to discuss outlet locations and code-compliant work. In a kitchen, complete structural and plumbing work before installing cabinets, templating and fabricating countertops, laying flooring, and adding finishing details. This sequence gives cabinet measurements and countertop work a stable base. Installing floors too early can leave them exposed to scuffs, paint, or residue from later work.
Set the renovation’s pace before demolition begins. Preparing for a single-room remodel can take weeks or months, so allow time to settle the plan and select fixtures. Put the layout, fixture specifications, and work sequence in one shared document. During preparation, clear the work area, protect items that will remain, and mark planned fixture locations on the walls. These steps give everyone a clear reference before rough-in begins.
Review the marked plan in person before work starts. Open doors and drawers, trace the route from the entrance to work areas, and check access to windows. If an outlet is planned behind an appliance, move it on the drawing first. Careful planning supports better function and helps prevent changes from interrupting the renovation.
2. Checking contractor credentials and insurance
Before hiring, confirm that the contractor has appropriate bonding, insurance, state licensing, and required certifications. Requirements vary by location and project, so compare the contractor’s documents with the rules that apply where you live. For an older home, ask whether the contractor has the certification needed to handle lead or asbestos hazards if those materials may be disturbed. A bathroom update in an older house can involve hidden conditions, so relevant experience matters as much as a polished portfolio.
Review each contractor’s completed projects, then speak with references about work similar to yours. Ask how the team handled schedule changes, protected the home, and resolved concerns. Notice whether the contractor returns calls promptly. Communication before signing offers a useful indication of how questions may be handled during construction. Compare at least three estimates based on the same scope and material expectations. A lower total may reflect a missing task rather than better value.
How do you compare contractor bids and spot hidden costs? Compare the same work line by line, including demolition, disposal, materials, labor, and finishing. Look for vague allowances, exclusions, and tasks described as extra, then ask for each item’s scope and assumptions in writing. If one estimate omits replacing damaged subflooring, for example, the difference may appear later as a change order.
A remodeling contract should describe the work, materials, schedule, payment stages, change-order process, and cleanup expectations. It should also explain who coordinates subcontractors and vendors, such as the plumber, electrician, cabinet supplier, and countertop installer. Read the contract alongside the estimate and keep approved revisions in writing. This gives both sides a shared record when a selection changes or a delivery affects the schedule.
Raise concerns early and clearly. Instead of saying “the bathroom looks wrong,” point to the tile layout, fixture location, or written selection that differs from the plan. Record the issue, discuss its effect on the work sequence, and agree on the next step in writing. A specific message helps the contractor respond to the actual problem, not guess what you mean.
What should you inspect before making final payment to a remodeling contractor? Walk through each room against the agreed scope, test installed fixtures and switches, and check finishes, doors, drawers, and visible surfaces. List incomplete or damaged items, then document the agreed correction plan before settling the final balance. In a bathroom, run the faucet and shower, inspect for leaks, and confirm that cabinet doors open smoothly.
For a kitchen or bathroom project, organized communication helps contractors and vendors work from the same decisions. Keep the signed scope, estimates, selections, and written changes together, and share updates with everyone affected. This record helps you track what was agreed and address discrepancies before they become bigger problems.
3. Setting a realistic budget and accounting for labor
A useful remodeling budget starts with a written scope, not a list of finishes. Separate labor, materials, demolition, disposal, and finishing work to see what each part requires. For a kitchen, account for cabinet installation, countertop work, flooring, and the trades needed for plumbing or electrical changes. A living room update may involve fewer trades, but surface repairs and paint preparation still take time. List essential work first, then price optional upgrades separately.
How much do common home remodeling projects cost in the United States? There’s no single dependable price for a kitchen, bathroom, or basement remodel. The total depends on the project scope, labor, materials, and existing conditions. A project-specific price is provided after a quote request.
Compare three estimates based on the same written scope. Check whether each includes the same labor, materials, demolition, disposal, and finishing details. A lower estimate may omit work included by another contractor, such as repairing a damaged surface after demolition. Ask for unclear allowances and exclusions to be explained in writing. This keeps the comparison focused on the work, not just the bottom-line total.
Set aside a 10-20% contingency for unexpected expenses. Demolition can uncover damaged framing, outdated wiring, or plumbing problems behind walls. Keep that reserve separate from the amount assigned to chosen finishes. If an underlying issue appears, decide whether it affects safety or the project’s function before spending the reserve on a trend-driven upgrade. That order helps protect essential work without treating every surprise as a reason to expand the design.
Give labor its own budget line because skilled work takes time, and trades often depend on one another. List each stage, such as demolition, structural repairs, plumbing, electrical work, installation, and finishing. Note which tasks must happen before the next begins. If a kitchen cabinet delivery shifts, for example, installation and later countertop work may also move. A schedule tied to the budget makes delays easier to understand and manage.
Before approving a change, write down its effects on labor, materials, and schedule. Replacing a planned bathroom fixture may require different connections or additional finishing work. Compare the change with your contingency budget and the project’s main goals. Leave trend-based choices until essential repairs and functional elements are covered. A clear budget helps you weigh each decision while keeping the renovation focused on your home’s needs.
Kitchen, bathroom, and basement remodeling costs vary with the work involved, labor, materials, and existing conditions. Request a quote for a project-specific price.
4. Following safety precautions and permit requirements
Before demolition, identify the work area, shut off electricity at the breaker, and keep a first-aid kit nearby. Wear work boots, safety goggles, hearing protection, and gloves when the task calls for them. Goggles and gloves, for example, help protect you while removing old trim, while hearing protection matters around loud tools. Keep walkways clear so workers can carry materials without stepping over debris. These preparations help make an update safer from the first day.
What permits and building codes apply to home renovations in my area? The answer depends on the project’s scope and local requirements. Electrical work, plumbing, and wall removals often require permits in the United States. Contact your county or municipal building department to identify the rules for your address. Plumbing and electrical work must also follow applicable codes.
Ask about permits before construction starts, not after the walls are closed. Permit reviews can affect the work sequence, inspections, and schedule, so include those steps in the plan. Removing a wall, for example, may affect structural support as well as the room layout. Describe the planned work clearly to the local building department, including changes to lighting, wiring, or plumbing. Keep permit records and inspection documents with your renovation paperwork.
Some homeowners also need approval from a homeowners’ association before making changes. Requirements depend on the home’s location and the association’s rules. Check before ordering materials or starting exterior work, such as changing windows or altering a visible entry. Building permits and HOA approval are separate considerations, so account for both when they apply. Written approval helps prevent avoidable disputes.
Skipping a required permit can have lasting consequences. Unpermitted work may be ordered removed, and missing permit records can affect a home’s resale or sale. Work done without a permit may also leave homeowners without insurance coverage if something serious happens. Keep copies of approvals, inspection results, and contractor documents. If plans change, record the revised scope and address permit requirements before proceeding with the changed work.
Older homes need particular care. For pre-1978 homes, federal rules require contractors to provide notification before work disturbing a painted surface begins, according to the U.S. Department of Housing and Urban Development. If hazardous-waste work is involved, the U.S. Department of Health and Human Services advises homeowners to establish that the contractor is responsible for crew safety, follows applicable laws, and uses transporters and disposers with liability insurance.
Match precautions to the task, too. A ladder doesn’t provide the same level of safety as scaffolding. Before demolition, confirm that utilities are shut off and the work area is controlled. These steps, along with permit checks, help protect people and keep the project on track.
5. Allowing time for material selection
Material decisions affect the schedule as well as the finished room. Allow two to six weeks for renovation planning and material selection. Use that time to compare samples, confirm dimensions, and coordinate each choice with the work sequence. Flooring can look different under your home’s lighting, so view a sample in the room before ordering. Decide on key finishes before crews need them, rather than choosing under pressure during installation.
Order materials according to when each trade needs them. Plumbing fixtures and electrical components may affect rough-in locations, while cabinets must be installed before countertop templating. Templating means measuring the installed cabinets to create a pattern for the countertop. Fabrication typically takes seven to ten business days after the cabinets are set and leveled. If the cabinets arrive late, later work may shift too. Put selection deadlines and delivery dates on one project calendar, and tell the contractor about changes promptly.
Before placing an order, check measurements, quantities, and product details against the plan. Include enough material in flooring and carpeting orders to account for installation waste and defects. Buy extra material when a future repair could be difficult to match. Tile from a different production lot, for example, may vary in shade or pattern. A small reserve can make a later repair less disruptive, particularly if the original material is no longer available.
Choose materials for daily use, not appearance alone. A busy entry needs flooring suited to frequent foot traffic, while a kitchen countertop should work for the way your household prepares food. Compare durability, care needs, and how each finish suits the room before deciding. Lower-grade materials may need replacing within a few years, so a less expensive choice upfront can create extra work later. Prioritize surfaces that affect everyday function.
Plan storage before deliveries arrive. Keep renovation materials in a cool, dry place, and protect wood and concrete with plastic sheeting. Store boxes off damp floors and keep product labels, which can help identify matching materials later. Separate fragile items from tools and debris. Flooring left in a moisture-exposed garage, for example, may be damaged before installation, wasting material and scheduled labor.
Timing can also shape purchasing options. Nationwide suggests scheduling carpet or flooring work in November or December, when home-improvement retailers may have sales and contractors may be more willing to negotiate. Treat this as one scheduling consideration, not a reason to rush a selection. Match the purchase window to the project calendar, product availability, and installation sequence. A considered choice, ordered on time and stored properly, helps keep the renovation moving without sacrificing a durable finish.
River City Construction Inc: Kitchen Remodeling
River City Construction Inc helps homeowners turn careful planning into an organized kitchen remodel. If you’re weighing fixture locations, material choices, or the sequence of construction work, bring those decisions into the project conversation early. A clear plan helps align the kitchen layout and finishes with how your household uses the space. River City Construction Inc also handles bathroom and basement remodeling and Accessory Dwelling Unit (ADU) projects when those better suit your home’s needs. To discuss a kitchen project, share your goals and the work you’re considering with River City Construction Inc.
Make your next renovation decision with confidence
Avoiding home remodeling mistakes starts with treating your plan as a working guide, not a fixed script. Keep decisions visible, record changes, and make sure each choice supports how you want your home to function. That steady attention can help turn a complicated project into a considered space suited to everyday life.
River City Construction Inc offers kitchen, bathroom, and basement remodeling for homeowners ready to discuss a project. Share your goals and the changes you’re considering to identify a practical next step. A clear starting point can make it easier to move from ideas to a renovation plan.
Your home can take shape one well-considered decision at a time.
Frequently Asked Questions
What are the most common home remodeling mistakes homeowners make?
Common problems often begin when choices are made in isolation: a finish is selected before its dimensions are checked, a schedule ignores delivery dependencies, or an upgrade is approved without considering its effect on other work. To avoid home remodeling mistakes, test each decision against the room’s daily use and the written project scope. For example, check that a new appliance fits its opening before ordering surrounding cabinets.
How do you create a realistic home remodeling budget and contingency fund?
Start with a defined scope and separate essential work from optional improvements. Record quantities, material selections, labor, and allowances so the plan reflects the actual project, not a broad guess. Keep contingency funds as a distinct budget line, with a clear rule for when they can be used. For example, reserve them for an unexpected repair discovered during construction, not a finish upgrade chosen after work begins.
How do you choose and vet a remodeling contractor?
For homeowners in Boston, Winchester, Medford, Somerville, Cambridge, Belmont, Lexington, Concord, Wellesley, Newton, Wayland, and Natick, River City Construction Inc is licensed and insured. Its design-build approach brings design, planning, budgeting, and construction together under one coordinated team. This helps keep project decisions connected from early planning through construction. Review the proposed scope and process to see how they fit your home’s needs.
How can you plan a remodeling project timeline and avoid delays?
Build the schedule around dependencies, not just hoped-for start and finish dates. Installation may rely on a supplier delivery, while a later trade needs earlier work completed first. Set selection deadlines, track delivery dates, and identify which tasks can proceed if an item is delayed. Keep a shared calendar with everyone involved, then update it whenever a selection or delivery changes.
How can homeowners avoid costly design and material-selection mistakes?
Test important choices in the room before ordering. Place a flooring sample near the windows and view it in daylight and evening light; compare finishes with existing surfaces, too. For a kitchen, check that cabinet and appliance dimensions work together on the plan. Consider cleaning and wear as well as appearance. A material suited to everyday habits is less likely to feel like the wrong choice after installation.
What safety risks should homeowners consider during a remodel?
Consider who will be near the work, including children, pets, and visitors, and agree on clear boundaries around active areas. Ask how the crew will manage dust, debris, tools, and access at the end of each workday. Keep household members away from exposed wiring, open walls, and stored materials. If construction changes the usual route through the home, plan a safe alternative before work disrupts it.
How can you prevent scope creep and manage changes during construction?
Keep one current record of the agreed work, selections, and approved revisions. Before accepting a change, write down what is changing, why it’s needed, and how it affects the schedule and budget. Then decide whether it’s essential now or can wait for a later project. Replacing a finish during construction, for instance, may affect ordering and installation, so record the decision before the crew proceeds.