A bathroom vanity with double sink installation can be a DIY project when the cabinet fits the space, the sink centers align with existing plumbing, and you can secure and level the unit. Standard double vanity cabinets commonly come in 60-inch and 72-inch widths. If drain or supply lines need to be relocated, hire a licensed plumber.
Adding a second sink can make a bathroom more practical, but it requires planning both sink positions and checking how each connects to the plumbing. Sort out these details before setting the cabinet to avoid difficult mid-project surprises.
This guide covers assessing your DIY readiness, measuring wall and floor space, checking plumbing alignment, marking sink centers, and installing and leveling the vanity. You’ll also learn which tasks may be manageable on your own and when plumbing changes call for professional help.
Key Takeaways
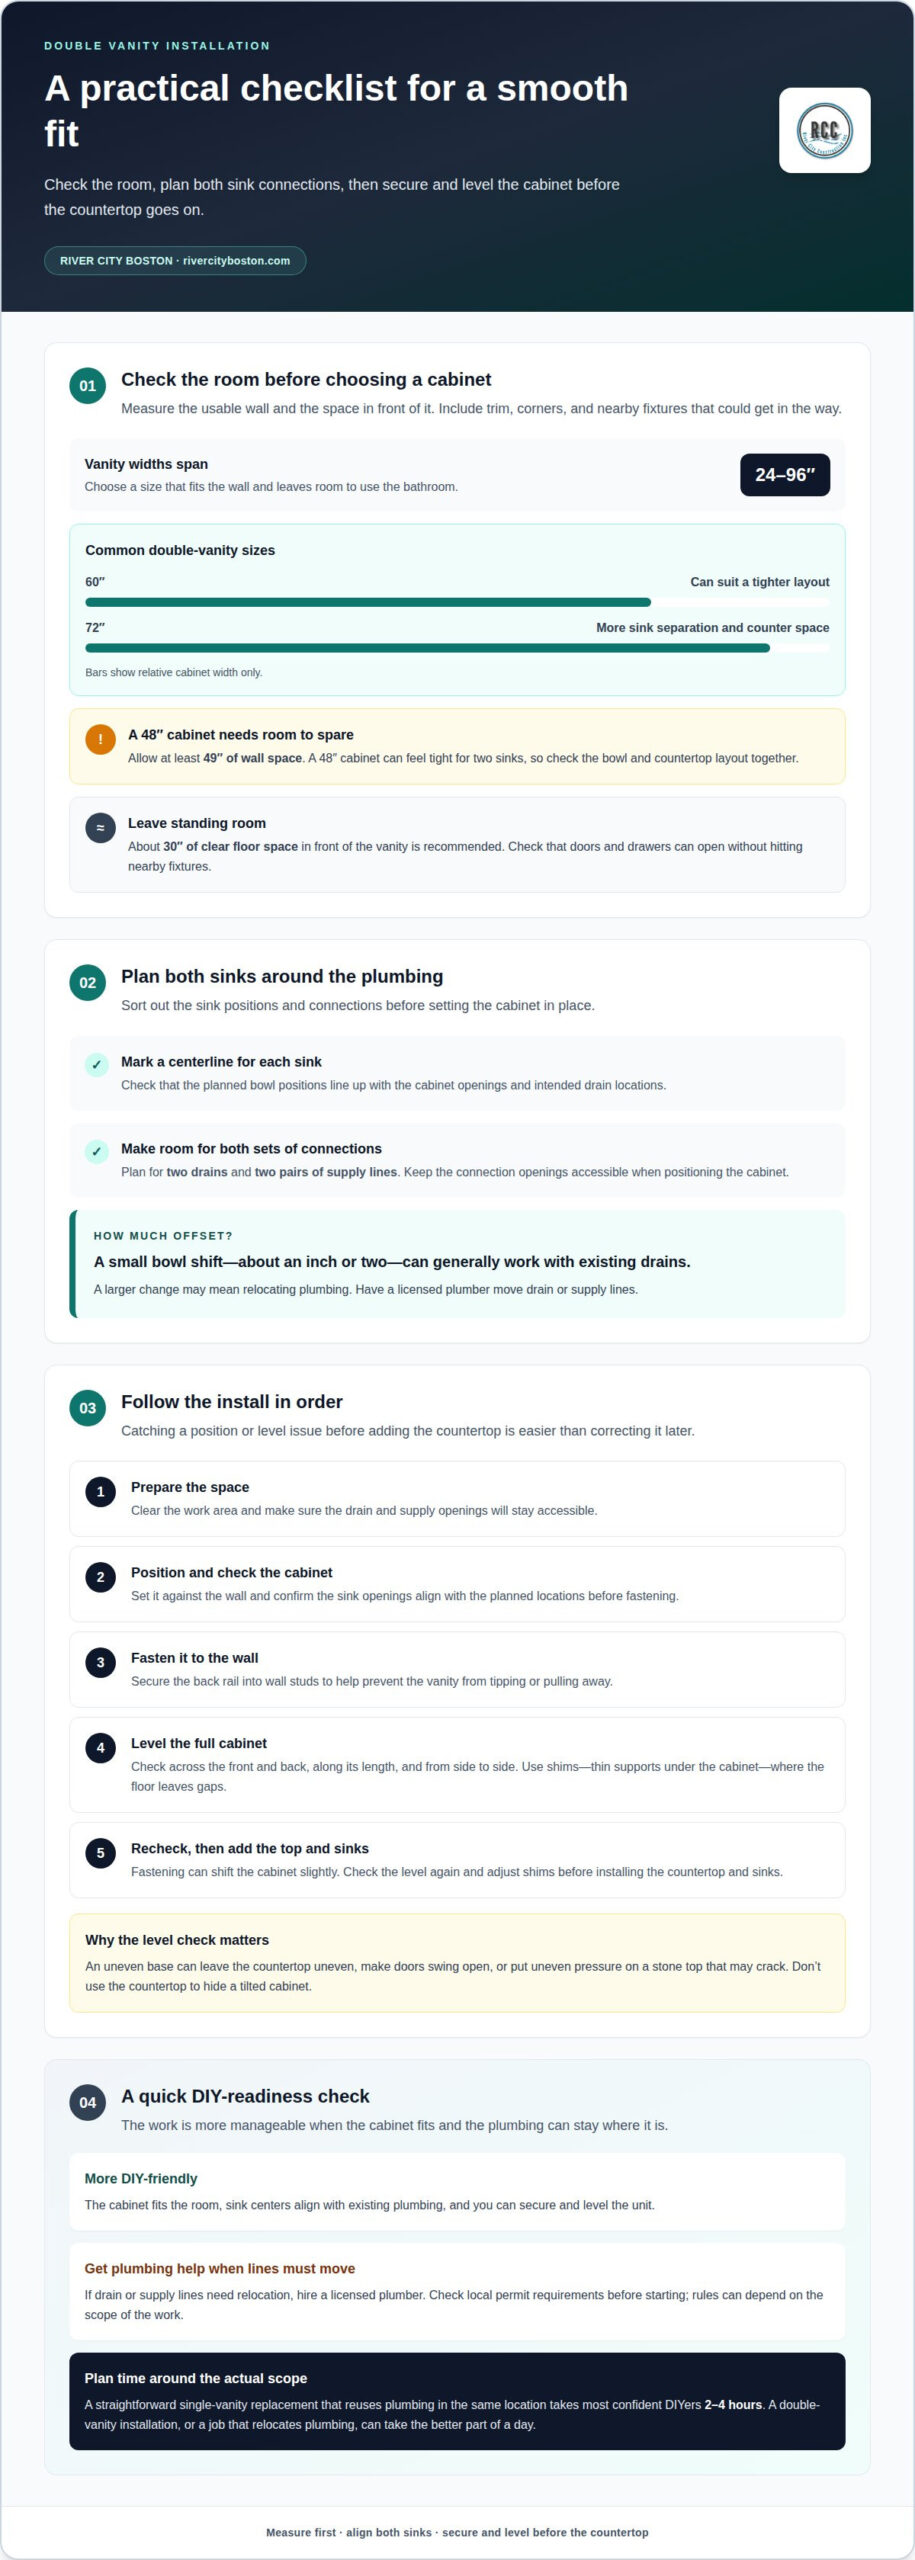
- Before choosing a cabinet, account for wall fit and room to stand in front of the vanity. A 48-inch vanity needs at least 49 inches of wall space, and about 30 inches of clear floor space is recommended.
- Plan a centerline for each sink and allow for two drains and two pairs of supply lines before positioning the cabinet.
- Small sink-bowl offsets of an inch or two from existing drains can generally be accommodated, but larger changes may call for plumbing relocation.
- Fasten the vanity through its back rail into wall studs, then shim it level across its length to support the countertop evenly.
- Use the installation steps to judge whether the project fits your DIY skills or whether bathroom remodeling support would make the work more manageable.
Can I install a bathroom vanity myself?
A confident DIYer may be able to replace a double vanity if the cabinet fits and the plumbing stays in place. Choose a width that accommodates both sinks, then assess the work, local permit requirements, and labor involved.
Choose a Vanity Size and Style
- Measure the available wall before choosing a cabinet. Vanity options span 24 to 96 inches, while standard double vanities commonly come in 60-inch and 72-inch widths.
- Match the width to the room and how you’ll use it. A 60-inch vanity can suit a tighter layout. A 72-inch unit offers more separation between sink stations and more counter space for daily items.
- Consider how two bowls fit the cabinet. A 48-inch cabinet can feel tight for two sinks, and cabinets at 48 or 84 inches are less common. Check the basin and counter layout together before choosing.
- Choose a style that works with your routine. Drawers can organize daily items, while cabinet doors provide access to larger storage areas. Check that doors and drawers can open without hitting a toilet, door, or nearby fixture.
- Assess the installation, not just the assembly. A straightforward single-vanity replacement that reuses plumbing in the same location takes most confident DIYers 2-4 hours. A double vanity installation or a job that relocates plumbing can take the better part of a day.
- Plan to fasten the cabinet securely. A bathroom vanity should be fastened through its back rail into wall studs to help prevent tipping or pulling away from the wall.
Check Permit and Plumber Needs
Before starting, find out whether local requirements call for a permit for your planned work. Rules can depend on the scope, so don’t assume a replacement and a layout change follow the same requirements. Have a licensed plumber relocate drain or supply lines. Keeping the existing sink locations and connections can simplify the plumbing work.
Review Installation and Labor Costs
Plan separately for the cabinet, countertop, plumbing, removal, and installation. The project cost depends on its scope, including the cabinet and countertop selections, plumbing changes, removal, and leveling. There is no single labor cost for every bathroom in the US. Labor depends on whether the cabinet fits the existing layout, the floor needs adjustment, or plumbing must be moved. A like-for-like replacement involves different work from a changed sink layout.
Installation sequence and leveling
Installing a double vanity, particularly when plumbing needs to move, can take much of a day. Work in a clear sequence, and level the cabinet before supporting the countertop.
Follow the Installation Sequence
- Prepare the cabinet location. Clear the work area and position the vanity where it will be installed. Keep the drain and supply openings accessible so the cabinet doesn’t block the connections.
- Set the cabinet in place. Move it carefully against the wall, then confirm it sits in the planned position. Check that the sink openings align with the intended locations before fastening the cabinet.
- Secure the cabinet to the wall. Fasten through the back rail into wall studs to help prevent the vanity from tipping or pulling away. Make sure the cabinet remains in position as you secure it.
- Check the cabinet before adding the top. Use a level across the cabinet and along its length. Correct any tilt first, because the countertop depends on even support.
- Install the countertop and sinks. Once the base is stable and level, fit the countertop and set both sinks according to their intended positions. Keep plumbing connections accessible as you complete the setup.
Following the steps in order helps catch positioning problems while they’re still easy to correct. For example, adjusting the cabinet before installing the countertop is simpler than compensating for a tilted base afterward.
Level and Shim the Cabinet
- Check the cabinet along its full length. A long vanity can sit unevenly even when one end looks level. Check across the front and back, then from side to side, so you can identify where the cabinet needs support.
- Add shims where the base needs support. Shims are thin pieces placed beneath the cabinet to correct uneven contact with the floor. Add them where needed, then recheck the cabinet rather than assuming one adjustment levels the whole base.
- Recheck after securing the cabinet. Fastening can shift the cabinet slightly. Check the level again before setting the countertop, and adjust the shims if the cabinet has moved.
- Confirm even support before proceeding. A cabinet that isn’t shimmed level can leave the countertop uneven, cause doors to swing open, or put uneven pressure on a stone top that may crack. Don’t use the countertop to hide a tilted cabinet.
Careful leveling gives both sink stations a stable base and helps the doors sit properly. Recheck the entire cabinet before moving on to the countertop.
Measuring available wall and floor space
Measure the room before choosing a cabinet, not after it arrives. Wall width, floor clearance, and uneven surfaces all affect where a double vanity can fit.
- Measure the usable wall width. Use a tape measure across the wall where the cabinet will sit, from one obstruction to the next. Include trim, door casings, and corners that could interfere with the vanity. Measure at more than one height because walls may not be perfectly straight. Use the narrowest usable measurement when choosing a cabinet.
- Leave room for the cabinet to fit. Choose a cabinet one to two inches narrower than the measured wall space. That margin helps prevent the vanity from scraping the walls during placement. For example, a 48-inch vanity requires at least 49 inches of wall space. Compare the cabinet’s actual width with the space available, rather than relying on a rounded room measurement.
- Check the floor area in front. Measure from the wall to the nearest obstruction, such as a tub, toilet, or door swing. About 30 inches of clear floor space in front of a bathroom vanity is recommended. Use that figure to assess whether the cabinet leaves enough room to stand and move comfortably. A door that opens into the vanity area can reduce usable clearance.
- Map nearby obstacles. Mark where baseboards, outlets, trim, and adjoining fixtures meet the wall or floor. A cabinet may fit between two walls but still collide with a projecting baseboard or block an outlet. Note these features before settling on the final position. A simple sketch with the wall width and obstacle locations can make cabinet comparisons easier.
- Check for an uneven floor. Look along the vanity’s planned footprint for dips or raised areas. Set a straight edge or level across the floor to identify where contact changes. An uneven surface can leave one cabinet corner unsupported or make the top appear tilted. Record where the floor rises or falls so the installer can plan shimming after positioning the cabinet.
- Measure the full footprint again before purchase. Compare the chosen cabinet’s width and depth with the marked floor area, then account for nearby doors and fixtures. Confirm that the cabinet can be carried into the bathroom and turned into position. A vanity that fits the wall measurement may still be difficult to maneuver through a narrow doorway.
- Keep the measurements together. Write down the wall width, available depth, floor clearance, and locations of obstacles. Use those figures when comparing cabinet dimensions and planning the installation position. This record also helps distinguish a tight fit from a cabinet that simply needs a different placement.
Will a new double vanity line up with my existing plumbing?
It may, if both sink drains and supply lines work with the new cabinet layout. Small bowl offsets of an inch or two can generally be accommodated with flexible supply lines and some movement in the P-trap, the curved drain pipe beneath each sink.
Measure Wall Space and Existing Plumbing
- Record the plumbing positions before moving anything. Measure from a fixed wall edge to each drain and supply connection. Note their heights and which sink station each set serves. These measurements help reveal whether the new cabinet’s bowls can sit near the existing plumbing.
- Compare the measurements with the vanity layout. Mark where both sink bowls will sit, then compare their drain openings with the existing drains. A bowl shifted an inch or two may still connect using flexible supply lines and some play in the P-trap.
- Identify changes that need plumbing work. If either drain or supply line must move to reach a sink, plan for a licensed plumber. Don’t assume the cabinet can cover a mismatch or that a connection will fit simply because one sink lines up.
Check each sink position independently. One drain may align while the other is too far from its planned bowl, especially if the new vanity changes the spacing between sinks.
Remove the Existing Vanity
- Clear the countertop and empty the cabinet. Removing loose items first gives you room to access the connections and cabinet fasteners. Keep the area around the vanity clear as you work.
- Disconnect the existing sink connections before moving the cabinet. Keep track of which drain and supply lines serve each basin. If a connection resists or the plumbing needs relocation, stop rather than forcing it.
- Release the cabinet from the wall and lift it away carefully. Check for screws through the cabinet back or sides, then remove them before pulling the vanity forward. Once the old unit is out, inspect the exposed wall and floor where the replacement will sit.
Removing the old vanity reveals the actual plumbing positions, which may differ from the openings visible inside the cabinet. Compare those locations with your measurements before setting the replacement.
Identify Common Installation Risks
- Watch for one sink that aligns and one that doesn’t. A double vanity requires workable drain and supply connections at both bowls. Check each station separately instead of treating the pair as one connection.
- Avoid forcing a pipe to meet a misplaced drain. A mismatch beyond the small offset that flexible supplies and P-trap movement can accommodate may require relocation. A licensed plumber should handle moved drain or supply lines.
- Check the cabinet and plumbing together before fastening. A cabinet positioned without considering both sets of connections can block access or leave a bowl far from its drain. Confirm the planned sink positions and plumbing route before securing the vanity.
Careful measuring, followed by a check after removal, can reveal alignment problems before you secure the new cabinet.
Planning sink centerlines and plumbing for a double vanity
Map both sink positions before committing to countertop openings or plumbing changes. A bathroom vanity with double sink installation works best when you plan the bowl centers, cabinet interior, and connection points together.
- Start with the actual cabinet and countertop layout. Use the manufacturer’s drawing or countertop template to locate each bowl opening. Mark both sink centers separately, because the cabinet’s midpoint alone won’t show where the individual basins belong.
- Choose one fixed wall edge for measuring. Measure from that same edge to each sink center, then record both measurements. A shared reference makes it easier to compare the basin positions with existing drains and supply lines without confusing left-side and right-side measurements.
- Check the center marks against the cabinet interior. Look at the drawer, shelf, and divider positions behind each planned bowl. A drain location that falls behind a drawer can interfere with storage or make the connection difficult to reach. Adjust the layout before cutting or fastening anything.
- Plan a separate plumbing route for each sink. Allow for two drains and two pairs of supply lines. Identify which connections serve each basin, and make sure the proposed route leaves room inside the cabinet. Don’t assume a single sink’s existing connections will serve both bowls unchanged.
- Compare each drain with its bowl center. Check the left and right sinks independently. One side may align while the other needs a different connection route. A bathroom vanity with double sink installation requires a workable arrangement at both stations, not just a good fit for the first basin.
- Consider how the two stations will work at the counter. Check that faucets, handles, and basin rims won’t crowd each other or sit too close to a side wall. For example, a wide faucet handle near the center can make the space between bowls feel cramped, even when both openings fit the countertop.
- Finalize the plan before making permanent changes. Review the center marks, sink openings, cabinet obstructions, drains, and supply lines as one layout. If drain or supply lines need relocation, hire a licensed plumber. Keep the measurements with the cabinet plan so the installation follows the same positions.
River City Construction: Bathroom Remodeling
River City Construction Inc provides bathroom remodeling for homeowners planning a double vanity as part of a larger bathroom update. This is a practical fit when your project goes beyond replacing a cabinet, such as coordinating the vanity with changes to the room’s overall design. Planning the sinks, storage, and surrounding space together helps bring the finished bathroom together.
For broader home updates, River City Construction Inc also provides kitchen and basement remodeling. These services can help homeowners plan improvements across the spaces they want to update.
Contact River City Construction Inc to discuss your bathroom remodeling project.
Make the Vanity Part of a Thoughtful Bathroom Plan
A successful bathroom vanity with double sink installation should support how you use the room every day. As you plan the next stage, consider how the vanity’s finish, storage, mirrors, and lighting will work together. A coordinated plan helps the new feature feel integrated with the rest of the bathroom.
For a broader home project, River City Construction also provides kitchen and basement remodeling. These services can help homeowners plan updates across the spaces they want to improve.
Whether you’re ready to discuss your bathroom or still shaping a larger plan, a conversation can help you identify a practical next step.
Take the project one thoughtful decision at a time. A refreshed bathroom starts with a plan that suits your home and routine.
Frequently Asked Questions
Do you caulk around a bathroom vanity?
Caulk can seal the joint where the vanity or countertop meets the wall, closing a visible gap. Follow the instructions for the countertop and caulk materials in your bathroom. Keep caulk away from plumbing connections and access panels that may need attention later. For example, sealing a removable panel could make a future drain repair more difficult.
Should a bathroom vanity be attached to the wall?
Secure a freestanding vanity to the wall so it stays stable during everyday use. Attach it at the cabinet’s back rail where it can meet wall studs, rather than relying on caulk or the countertop’s weight. Before fastening, position the cabinet and check that its doors and drawers open freely. A wall-mounted vanity uses a different support arrangement, so follow its installation instructions.
What are the standard double vanity widths?
Common double vanity cabinet widths are 60 inches and 72 inches. The wider option gives the two sink stations more separation and adds counter space, while the narrower one can suit a tighter bathroom layout. Compare the cabinet’s full dimensions with the wall and nearby fixtures before choosing. Sink and faucet placement also affect how comfortably two people can use the counter.
What if my new bowls do not sit exactly over the old drains?
A small offset may still work if the drain connection and supply lines reach without being forced or strained. Compare each bowl with its own drain: one side may align while the other does not. If a drain or supply line needs to move, have a licensed plumber handle the work. Don’t rely on a tight bend or improvised connection to bridge a mismatch.
Why does a long vanity need so much leveling?
A long cabinet may sit unevenly if the floor changes height, leaving one end higher than the other. Uneven support can affect the countertop, cabinet doors, and sink seating. Check the cabinet at both ends and along its full length before installing the top. For example, a door that swings open after installation can indicate that the cabinet needs adjustment beneath its base.
What size bathroom vanity is needed for two sinks?
Many double vanity cabinets are 60 or 72 inches wide, but the right size depends on the room and sink layout. A 48-inch cabinet can feel tight for two bowls, so assess the basin dimensions and usable counter between them. Also account for nearby walls, doors, and fixtures. The cabinet must fit the bathroom while leaving both sink stations practical to use.
How much clearance and spacing do double sinks need?
Allow about 30 inches of clear floor space in front of the vanity so people can stand and move comfortably. For the sinks themselves, use the cabinet and countertop layout to assess the distance between bowls, faucet handles, and side walls. Check that both users have usable counter space and can reach their fixtures without crowding the other sink station.
What plumbing changes are needed to add a second bathroom sink?
A double-sink setup needs a drain and a pair of supply lines for each basin. If the bathroom currently has one sink, the plumbing may need changes to serve the additional bowl. The work depends on where the new sink centers sit relative to the existing connections. Have a licensed plumber handle any relocation of drain or supply lines and assess the planned connection route.